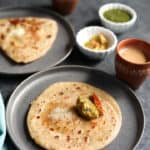
Paratha Recipe (Pan-fried Indian flatbread)
Paratha, one of the most popular unleavened flatbreads from India, is perfect to enjoy with pickle and a hot cup of chai for breakfast or alongside curry and yogurt raita for lunch or dinner.
Servings: 8
Ingredients
- 2 cups Whole Wheat flour
- 3/4-1 cup Water
- 1 teaspoon Salt
- 1 teaspoon Oil
For Rolling
- 1/4 cup Whole Wheat flour
- 2 tablespoon Ghee or Oil
For cooking
- 3 tablespoon Ghee or Oil
Equipment
- Marble or wood base chakla in Hindi
- Rolling pin belan in Hindi
- Tawa concave flat pan, or a cast iron pan.
- Flat spatula (Turner)
Instructions
Make Paratha Dough
- In a large bowl or flat plate with high edges, take the whole wheat flour. Add salt (optional). Slowly start adding water and mix with hand. Don’t add all water at once. Keep adding water as needed, while mixing.
- Once the dough starts to form, do not add more water. It takes a little more than 3/4 cup of water to make the dough. The amount of water will vary depending on the brand of whole wheat flour.
- Make the dough smooth by kneading it with your fist. Add some water to your hand and knead 2-3 times. When you press your finger against the dough, it should leave an impression. This is the right consistency of the dough.
- You can apply some oil to make the dough edges less sticky. but this is not necessary. Dough should be soft. not hard (hard is best for puri’s). Same dough for paratha can be used to make roti too.
- Cover with a damp cloth or plastic wrap and let the dough rest for at least 15 mins and up to 30 mins. This helps gluten to release and the dough becomes more elastic. Open and knead once again.
- Make balls from the dough by rotating between your palms. The balls will be the size of a golf ball, sightly larger in size than roti. Make the ball a bit flat.
Steps to roll layered round Paratha
- Dip a ball in dry flour, place on the marble or wooden base (chalka) and roll with the rolling pin. Roll into a circle of about 4 inches diameter.
- Spread some ghee (and optionally salt and ajwain) on the dough. Make a cut up to the center of the circle, using your fingers. Then start rolling on one side. Take the roll into your hand and flatten it.
- Dip again in dry flour and start rolling using the rolling pin. Do not apply too much pressure while rolling. Apply equal pressure on all sides while rolling. When you roll with gentle hands, the dough flattens and moves in circles with the rolling pin. You can also turn the paratha with your hands at 90 degrees multiple times while rolling, so that it forms a circle. Apply more flour if required while rolling.
Steps to roll layered Square shaped Paratha
- Dip a ball in dry flour, place on the marble or wooden base (chalka) and roll with the rolling pin. Roll into a circle of about 4 inches diameter.
- Spread some ghee (and optionally salt) on the dough. Bring one side of the rolled dough towards the center and press lightly. Now bring the other side on top of the folded dough and press lightly. Now fold along the other edge similar to above to make a square.
- Dip again in dry flour and start rolling using the rolling pin. Do not apply too much pressure while rolling. Apply equal pressure on all sides while rolling. You can also turn the paratha with your hands at 90 degrees multiple times to maintain the square shape while rolling. Apply more flour if required while rolling.
Steps to roll layered Triangle shaped Paratha
- Dip a ball in dry flour, place on the marble or wooden base (chalka) and roll with the rolling pin. Roll into a circle of about 4 inches diameter.
- Spread some ghee (and optionally salt, red chili powder) on the dough. Fold the rolled dough in half to form a semi-circle. Now fold from one end of the semi-circle to other to form a triangle shape.
- Dip again in dry flour and start rolling using the rolling pin. Do not apply too much pressure while rolling. Apply equal pressure on all sides while rolling. You can also turn the paratha with your hands along each edge multiple times to maintain the triangle shape while rolling. Apply more flour if required while rolling.
Cooking Paratha
- Pre Heat a Tawa (griddle) on medium-high flame. Pick the paratha, flip between both palms to remove any extra dry flour and carefully transfer to the tawa. Cook until you start seeing small air pockets and the color of the dough starts to change.
- With a flat spatula, flip the paratha and top with ghee just enough to make the surface of the paratha greasy (about 1/4 teaspoon). Spread the ghee evenly over the paratha with the back of the spoon. Now we want to cook until there are some brown spots on the paratha.
- Flip the paratha and top with ghee on the other side. Spread it evenly over the surface. Cook until there are brown spots while pressing gently with the spatula.
- When both sides have golden brown spots, transfer the paratha to a plate lined with a paper towel.
- Optionally apply ghee or butter and keep stacking them. Paratha’s are best served hot!
Video
Notes
Vegan Variation: Simply replace the ghee with your favorite vegetable oil in the recipe.
Best flour for paratha: I prefer Sujata Chakki Atta or Aashirvaad Select Sharbati Atta or Aashirvaad Whole Wheat Atta.
Possible issues with paratha dough
- If the dough gets too sticky, add a tablespoon of flour at a time and knead again till all the flour is absorbed.
- If the dough gets too hard, it means less water was added. Add a tablespoon of water at a time and knead again. The dough should be soft enough that if you press your finger against the dough, it leaves an impression.
- Knead the dough well, it should be not too hard and not too soft/sticky.
- Let the dough rest covered with a damp cloth for 15-30 minutes, so the gluten is released and it becomes more pliable.
- Roll the dough with soft hands, applying equal pressure on all sides.
- When learning to make paratha, you might need to use more dry flour. But always dust off any excess flour before cooking on the Tawa, otherwise the dry flour can make the paratha dry. As you get experienced, only apply dough once and roll the paratha.
- Making paratha needs lots of practice. So be patient and keep practicing.
Nutrition
Calories: 201kcal | Carbohydrates: 24g | Protein: 4g | Fat: 10g | Saturated Fat: 6g | Cholesterol: 24mg | Sodium: 292mg | Potassium: 122mg | Fiber: 3g | Calcium: 11mg | Iron: 1.2mg