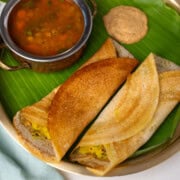
Masala Dosa
Learn to make perfect Masala Dosa at home with this detailed, well-tested recipe. These crispy South Indian crepes made from fermented rice and lentil batter are filled with a flavorful spiced potato masala and served with chutney and sambar. I’ve also shared helpful tips and tricks to help you get perfectly crispy dosas every time.
Servings: 14 dosa
Equipment
Ingredients
For Dosa Batter
- 1/2 cup Urad Dal dehusked split or whole urad dal gota
- 1 1/2 cup Dosa Rice or combination of dosa rice + sona masoori rice, idli rice works too (see notes)
- 1 tablespoon Split Chickpeas (Chana dal)
- 1 tablespoon Toor Dal (Split pigeon peas)
- 1/2 teaspoon Fenugreek seeds (Methi dana)
- 1/4 cup Poha (Flattened rice) soak for 20 minutes before grinding
- 1 teaspoon Non-iodized Salt rock salt (sendha namak)
- 7 tablespoon Ghee or Oil to cook dosa (half tablespoon for each dosa)
For Potato Masala
- 4 Potatoes boiled, peeled, cut into 3/4 inch pieces and slightly mashed
- 1 tablespoon Oil
- 1/2 teaspoon Cumin seeds (Jeera)
- 1/2 teaspoon Mustard Seeds (Rai)
- 2 teaspoon Split Chickpeas (Chana dal) soaked in hot water for 20 minutes
- 12 Curry Leaves (Kadi Patta)
- 2 Green Chili Pepper chopped, adjust to taste
- 1 pinch Asafoetida (Hing) skip for gluten-free
- 2 cup Onion thinly sliced
- 1 teaspoon Ginger grated
- 1/2 teaspoon Ground Turmeric (Haldi powder)
- 1 teaspoon Salt
- Cilantro for garnish
Instructions
Soaking
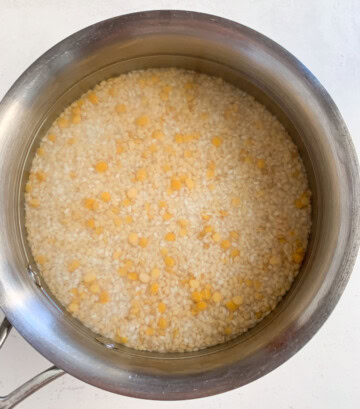
- Add urad dal, rice, chana dal, toor dal, and methi seeds to a large bowl.

- Rinse till the water runs clear. Soak in about 6 cups of water for 4-5 hours.
- Soak poha in water for about 20 minutes before grinding the batter.
Grinding the batter
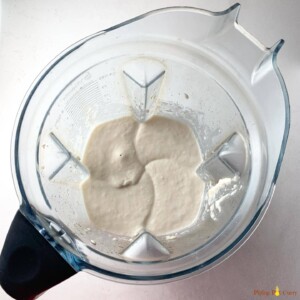
- Drain water from the soaked dal, rice, and poha. Add to a high-speed blender jar.
- Add about 3/4 to 1.5 cups of cold water as needed to grind the batter to a smooth paste. Start with less water and add as needed. Transfer the batter to a large steel bowl or the Instant Pot steel insert. Make sure to use a large bowl so there is space for the batter to rise.
- Add salt and mix the batter well using your clean hands for a couple of minutes. You can skip salt here if you live in a warm place. Make sure not to use iodized salt, as that affects the fermentation process.
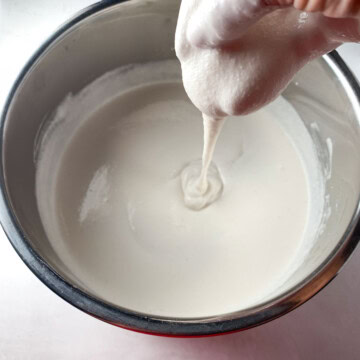
- The batter consistency should neither be thick nor runny, but rather it should be free-flowing.
Fermenting batter
- Cover the steel bowl with a lid and place it in a warm place. If you live in a cold climate, keep it in the oven with the lights on or on the counter in a warm climate.
- It can take 6-14 hours for the batter to ferment. The time varies depending on where you live. Once the batter is fermented, it should have increased in volume and must be frothy and airy on the top.
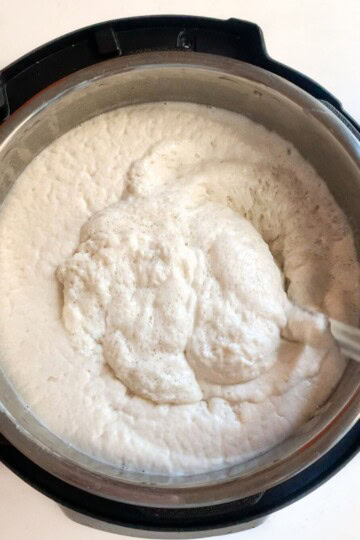
- You can check if the batter is fermented well by dropping a teaspoon of batter into a bowl of water. It should float on top and not sink.
- Stir the batter. You can transfer the batter needed to make dosa to a bowl. You can store this batter in the refrigerator for up to 5 days.
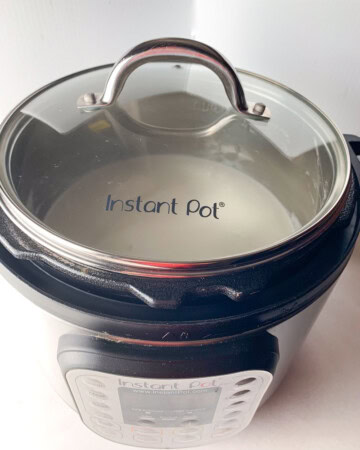
Fermenting in Instant Pot
- Place the steel insert in the Instant Pot and cover with a glass lid (do not use the Instant Pot lid, as sometimes batter can overflow and lock the lid).
- Set the Instant Pot to Yogurt mode for 12 hours by pressing the Adjust and + buttons. After the time is complete, the batter will be fermented and ready to use. If the batter has not risen well, ferment it for a couple of more hours.
Making Potato Masala
- Soak chana dal in hot water for 20-30 minutes to soften it. Then drain water and keep aside.
- Boil or steam the potatoes. In a stovetop pressure cooker, cook for 4-5 whistles. In an instant pot, pressure cook for 12-18 minutes depending on size of potatoes. Remove potatoes from pressure cooker, and let them cool a bit. Then peel the potatoes and crumble them. You can mash them completely or leave some pieces depending on your preference.
- In a large pan, heat the oil. Add cumin seeds, mustard seeds, chana dal and saute for a minute until the dal turns golden. Then add hing, ginger, curry leaves and saute for 1 minute until the raw smell of ginger is gone.
- Add the diced green chilis and sliced onions. Saute for 2-3 minutes until the onions soften.
- Add the boiled potatoes, turmeric and salt to the pan. Mix it all well. Then add 2-3 tablespoons of water to moisten the potatoes. Saute for 2-3 minutes.
- Turn off heat. Garnish with cilantro and the aloo masala for dosa is ready.
Making Dosa
- Stir the batter you have taken in a bowl to make dosa. Ensure it has a pouring consistency. You might need to add some water, as sometimes the batter becomes thicker while fermenting. If you skipped salt during fermentation, add it now and mix well.
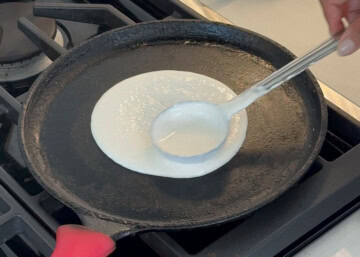
- Heat a cast-iron griddle (tawa) on medium-high heat. You can also use a non-stick dosa tawa, but cast iron is best for crispy dosa.
- Ensure the tawa is heated well before making dosa. You can sprinkle some water on it, and it should sizzle right away.
- Put a few drops of oil on the tawa and spread it with a paper towel all over the tawa. You can also use an onion cut in half and use the flat side to spread the oil, then wipe it clean with a paper towel. This helps to cool down the tawa and spread the batter in a thin layer. Lower the heat a little while spreading the batter, and change back to medium-high right after spreading the batter.
- Take a ladle full of the batter and pour it at the center of the tawa. Immediately start to spread the batter from the center out in a circular motion in one direction (I prefer clockwise). Try to spread as thin as possible.
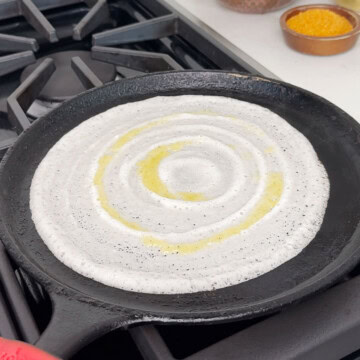
- Drizzle oil or ghee around the edges of the dosa and also some at the center. Let it cook until the dosa becomes golden brown and starts to leave or come out from the edges.
- Add the prepared potato masala to the dosa. You can add it to the center if you want to roll the dosa or spread it on half of the dosa to fold it. (Note: you can also choose to serve the masala as a side)
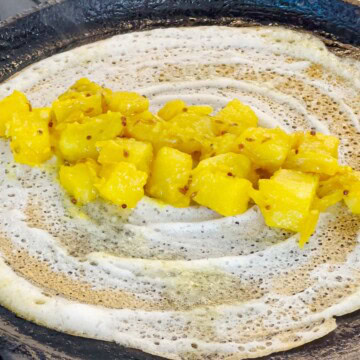
- Use a flat spatula to remove the dosa from the edges. Roll the dosa or fold it at the center covering the masala or fold to the side where you spread the potato masala. Remove from the pan and serve immediately.

- Before making the next dosa, wipe the tawa with a paper towel. Spread the oil again, then spread the dosa. Then increase the heat to high.
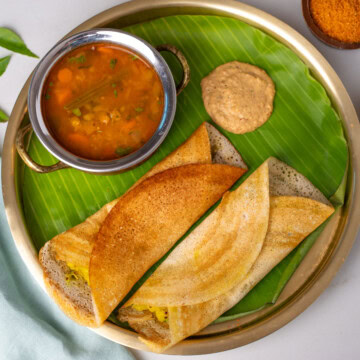
- Serve masala dosa with sambar, coconut chutney, and peanut chutney.
Video
Notes
Tip: If you are new to making Dosa, then I highly recommend reading the whole post as I share lots of tips and tricks to get the perfect batter.
Rice: You can use Dosa Rice, Idli Rice, or Sona Masoori Rice to make dosa. You can use just one of them or use equal parts of idli/dosa rice and sona masoori. The texture of the dosa can vary depending on the rice used. Try and see your preference.
Blender: I used a high-speed blender (Vitamix) to grind this batter. You can also use a wet grinder.
Spreading batter: It is crucial to have the tawa/griddle at the right temperature when spreading the batter. Otherwise, the batter does not spread properly and sticks to the pan. Follow the tips in the recipe. Also, make sure your cast-iron pan is seasoned well.
Storing batter: You can store the batter in an airtight container for up to 5 days.
Idli Dosa Batter: You can also find my Idli Dosa Batter recipe here. That works great for dosa too, but the dosa with this recipe are a bit crispier than with the other recipe.
Nutrition
Calories: 241kcal | Carbohydrates: 35g | Protein: 5g | Fat: 9g | Saturated Fat: 5g | Polyunsaturated Fat: 0.5g | Monounsaturated Fat: 3g | Cholesterol: 19mg | Sodium: 360mg | Potassium: 316mg | Fiber: 4g | Sugar: 2g | Vitamin A: 35IU | Vitamin C: 23mg | Calcium: 33mg | Iron: 2mg