

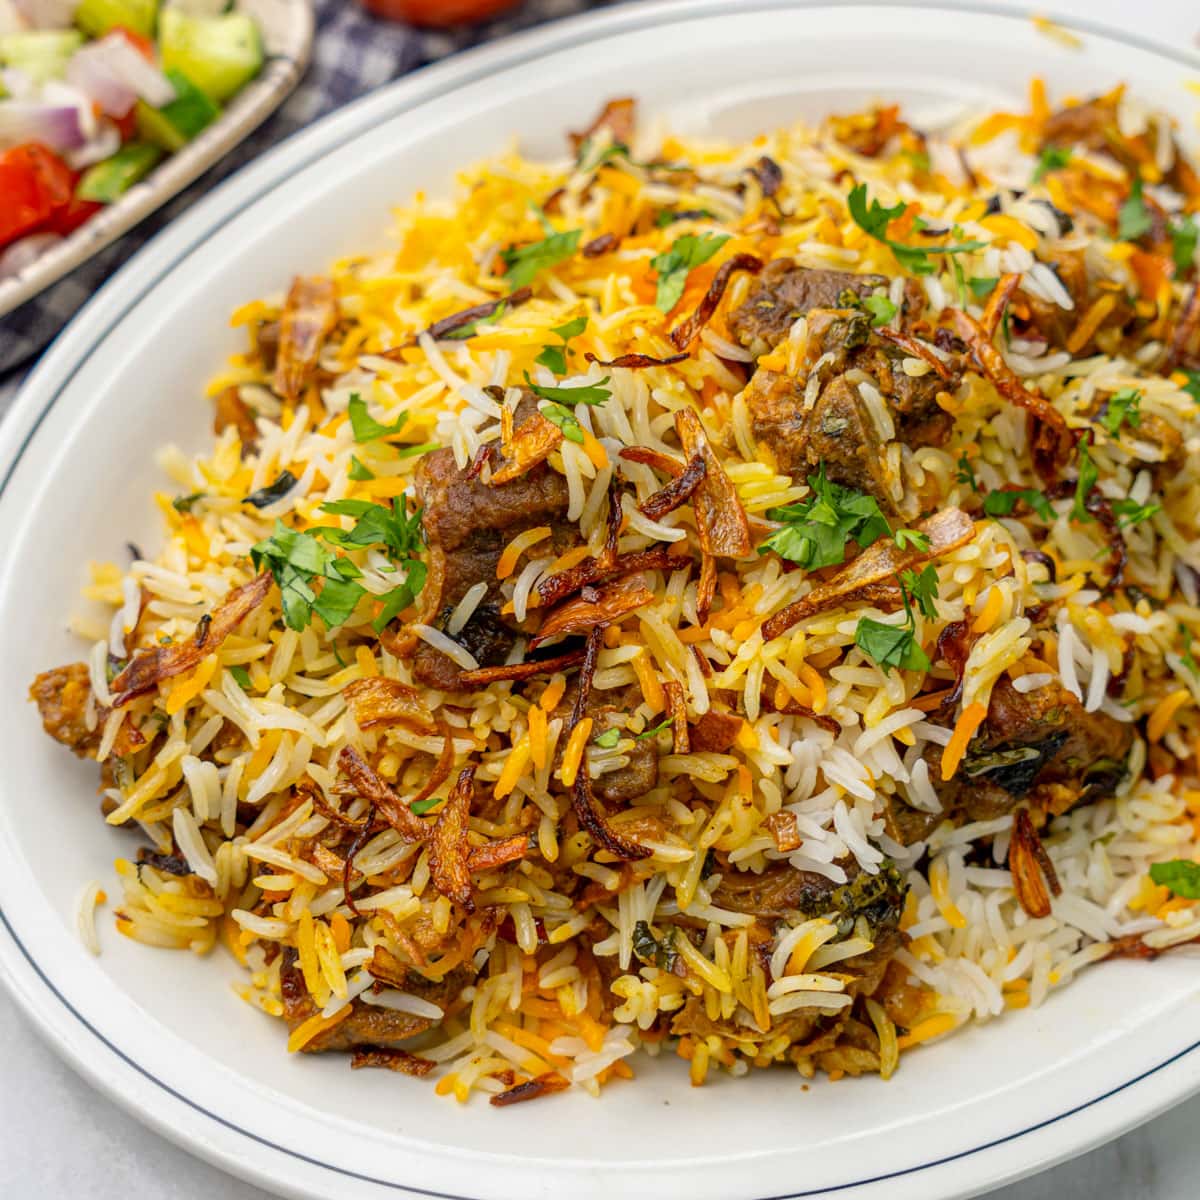
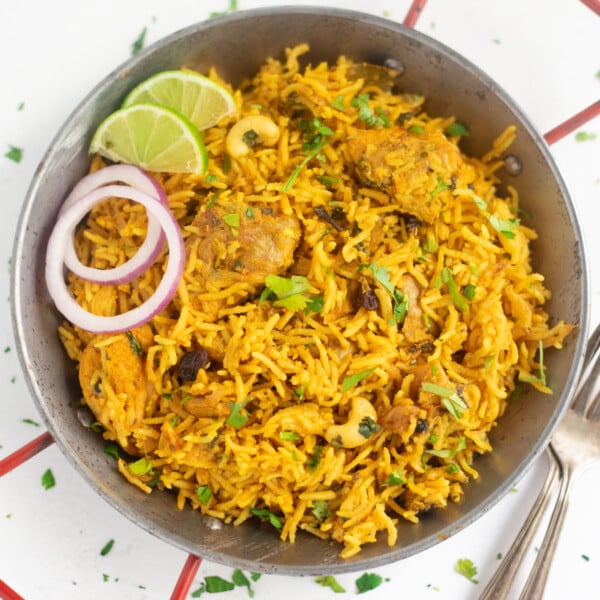
With this tried-and-tested recipe, learn how to make the most flavorful restaurant-style mutton biryani. This authentic Mutton Biryani features layers of fragrant basmati rice and succulent tender mutton or lamb topped with crispy fried onions and slow-cooked to perfection in traditional dum style.
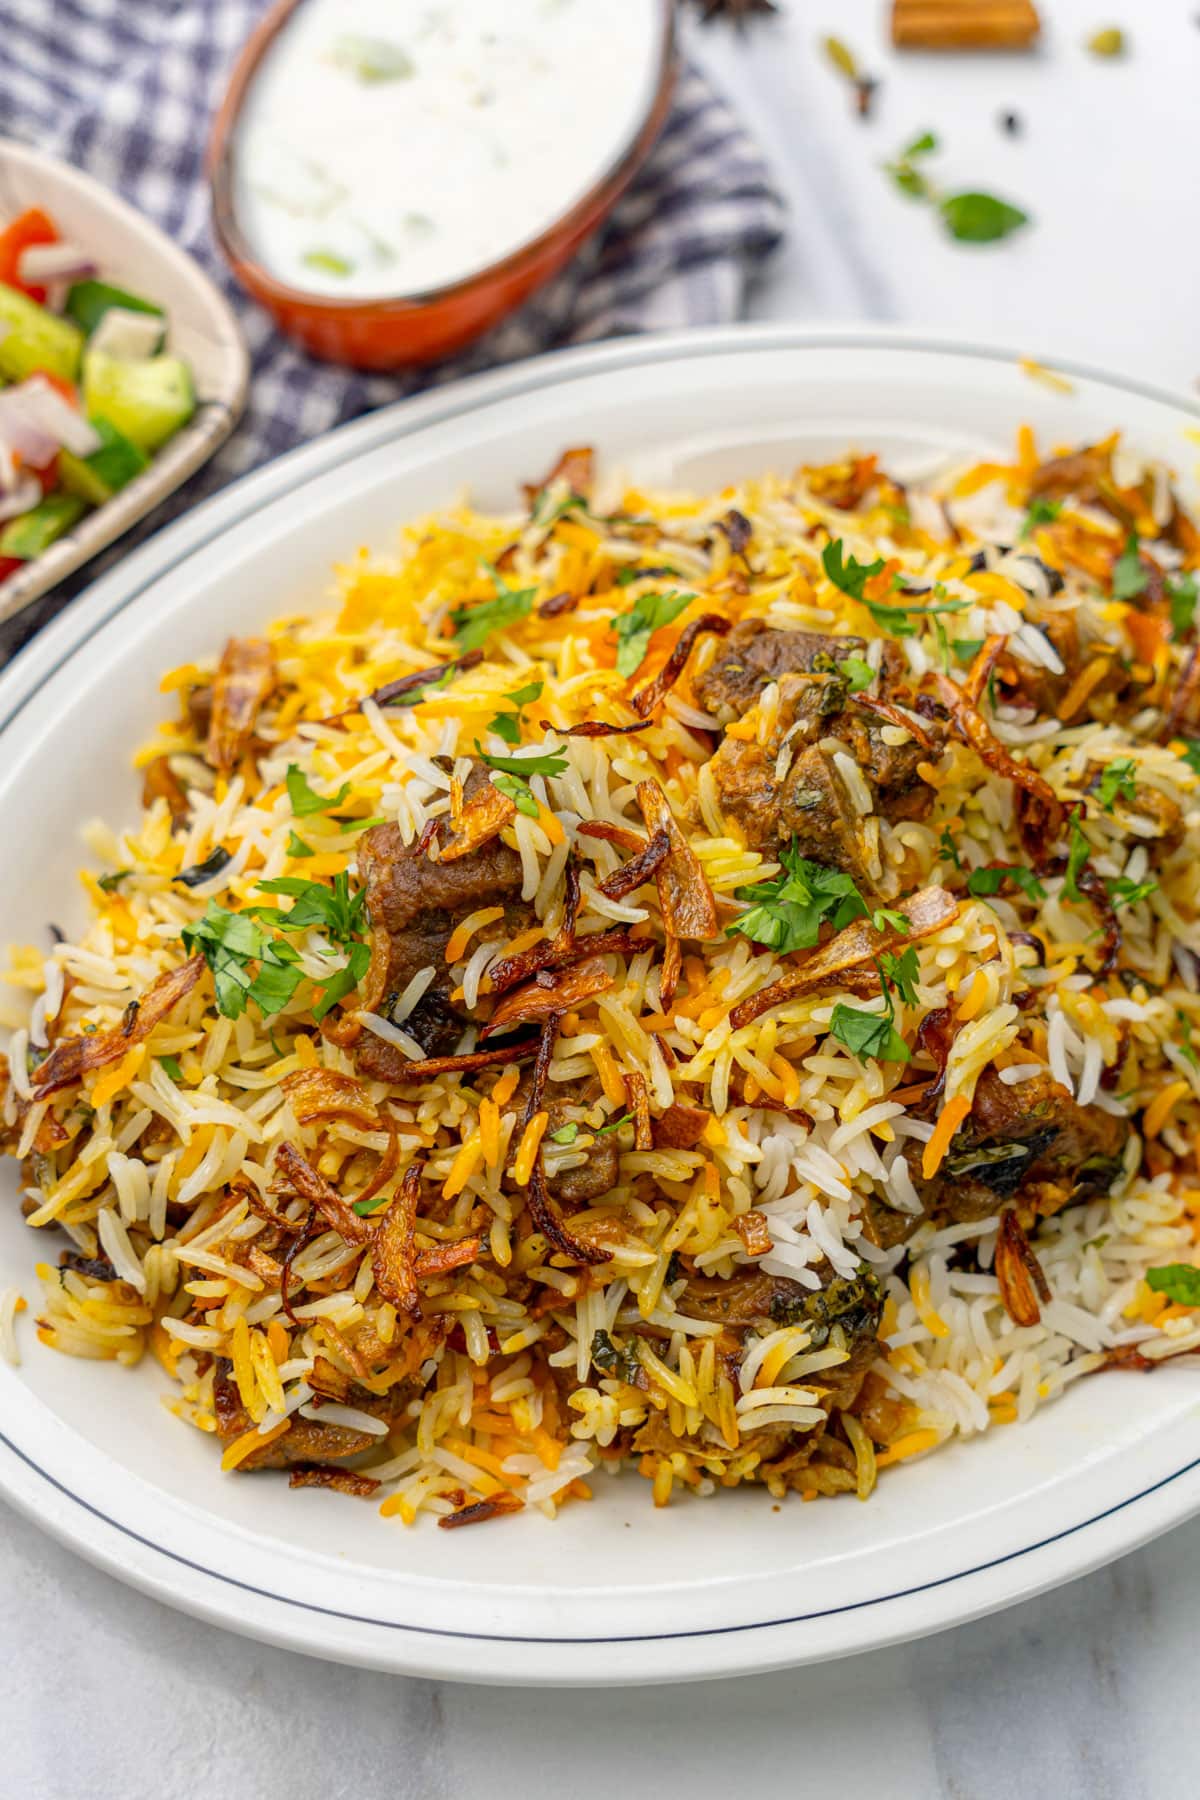
Mutton Biryani is a guaranteed crowd-pleaser! This flavorful dish is a hit at my house. Tender mutton and fragrant basmati rice combine to make a comforting and satisfying meal. Enjoy it with a cooling raita and mirchi ka salan!
Mutton has always been a favorite at my home (much more than chicken!). And this mutton biryani is the most iconic dish you can make with goat meat. However, if you cannot find goat meat, you can surely make this recipe with lamb as well.
Looking for more biryani recipes? Check out my Chicken Biryani, Egg Biryani, Shrimp Biryani, and Instant Pot Vegetable Biryani
Table of Contents
Watch How to Make Mutton Biryani
About Mutton Biryani Recipe
Mutton biryani, also known as goat biryani, is a dish made with layers of tender marinated mutton and fragrant basmati rice and topped with deep-fried onions. This recipe is a simplified version of the legendary Hyderabadi biryani, making it approachable for home cooks without compromising taste.
Here’s what makes this biryani special:
- Goat meat boasts a deeper flavor than chicken, adding a unique depth to the dish.
- Perfectly cooled rice and the right cut of meat are essential to a good biryani.
- This recipe borrows the essence of the famed Hyderabadi biryani, known for its complex spice blends and layered construction.
- I’ve streamlined the process, making creating this restaurant-worthy dish in your kitchen easier.
So, if you’re looking for a flavorful and easy-to-make biryani at home, this mutton biryani is the perfect choice!
Lamb vs. Mutton
Lamb and mutton are both delicious options, but there are slight differences. Lamb is meat from younger sheep, offering a milder flavor and softer texture. Mutton comes from mature sheep or goats, resulting in a stronger flavor and slightly firmer texture.
That said, use what you can find easily. Either way, you will love this biryani!
If you are a fan of mutton just like me, try these aloo gosht, keema, rogan josh, and mutton pulao recipes.
Kachi Vs. Pakki Biryani
There are broadly two ways biryani is prepared:
- Kachhi biryani (Kacche Gosht ki Biryani) is where raw meat is cooked with rice. “Kacchi” means “raw”. As raw marinated meat is used in this method, it has to be cooked slowly for a very long time.
- Pakki biryani (Pakki Gosht ki Biryani), where pre-cooked meat is cooked with parboiled rice. “Pakki” means “cooked”. This is faster, as the meat and rice are pre-cooked, then layered, and cooked in “dum” style so the flavors meld together.
My preference is the later Pakki Biryani, which is the recipe I am sharing below. In my experience, it is a much more reliable method and makes sure you get a good restaurant-style result.
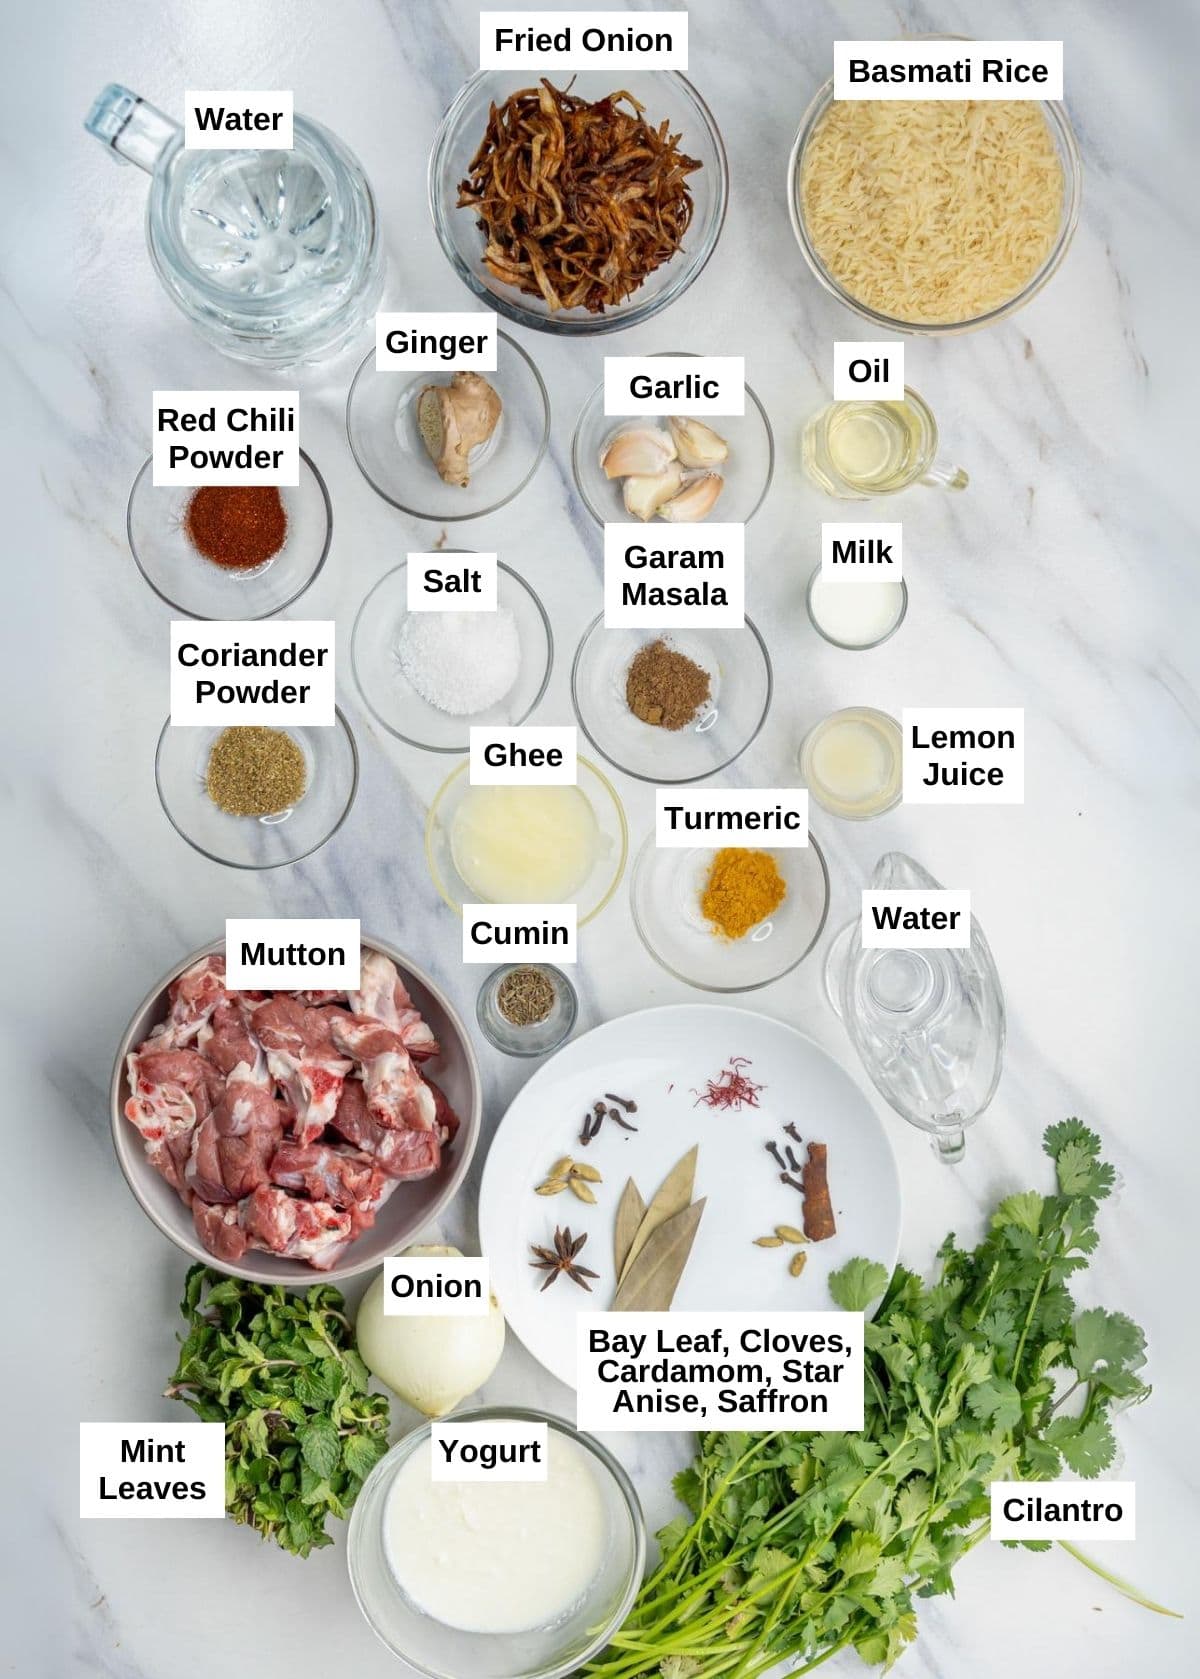
Ingredients of Mutton Biryani
The Star: Mutton
- Mutton or Lamb: The star of the show! Choose bone-in pieces for extra flavor. It is best to use shoulder or leg cuts for biryani.
Marinade
- Yogurt: Thick, full-fat yogurt tenderizes the mutton and adds a touch of tanginess.
- Aromatics: Freshly grated ginger and minced garlic form the base of the flavorful marinade.
- Spices: Use Kashmiri red chili powder, turmeric, coriander powder, salt, and garam masala.
- Lime: A squeeze of lime or lemon juice balances the flavors.
Saffron
- Saffron: A luxurious touch for a vibrant color and subtle aroma.
- Warm Milk: Use to infuse saffron threads.
Rice:
- Basmati Rice: I like to cook biryani using premium extra long-grain basmati rice. If you use other rice, the biryani may be less fragrant.
- Whole Spices: Bay leaf, cloves, cardamom pods, and star anise add depth and complexity to the rice.
For Mutton Masala
- Oil and Ghee: A combination of oil and ghee adds richness to the masala.
- Aromatics: Thinly sliced yellow onion forms the base of the masala.
- Whole Spices: Use cinnamon sticks, cloves, cardamom pods, and cumin for an earthy aroma.
The Biryani Layers:
- Ghee: Melted ghee adds moisture and richness to the assembled biryani.
- Fried Onions: Adds a touch of sweetness and crunch.
- Fresh Herbs: Chopped mint and cilantro leaves add a burst of freshness.
Best Rice for Mutton Biryani
When it comes to Mutton Biryani, one type of rice reigns supreme: basmati! Sela Basmati rice is also traditionally used for biryani.
Unlike short-grain rice, which gets sticky, Basmati rice has long, thin grains. This means they cook up nicely and separately. Basmati rice also soaks up all the delicious spices and juices from the mutton masala, making the biryani much more delicious.
Best Cut Of Mutton For Biryani
When picking mutton for your biryani, bone-in pieces are your best bet! Bones add flavor to the biryani as they simmer in the pot. Imagine all those yummy juices soaking into the rice – delicious!
I recommend using shoulder or leg meat for biryani. They have more connective tissue and fat, which break down during cooking, making the meat tender and rich in taste.
How to Make Mutton Biryani?
There are five main steps to make this goat biryani.
- Marinate the meat
- Prepare fried onions or Birista
- Making Mutton Masala
- Cook Parboiled Rice
- Layer and Cook Biryani
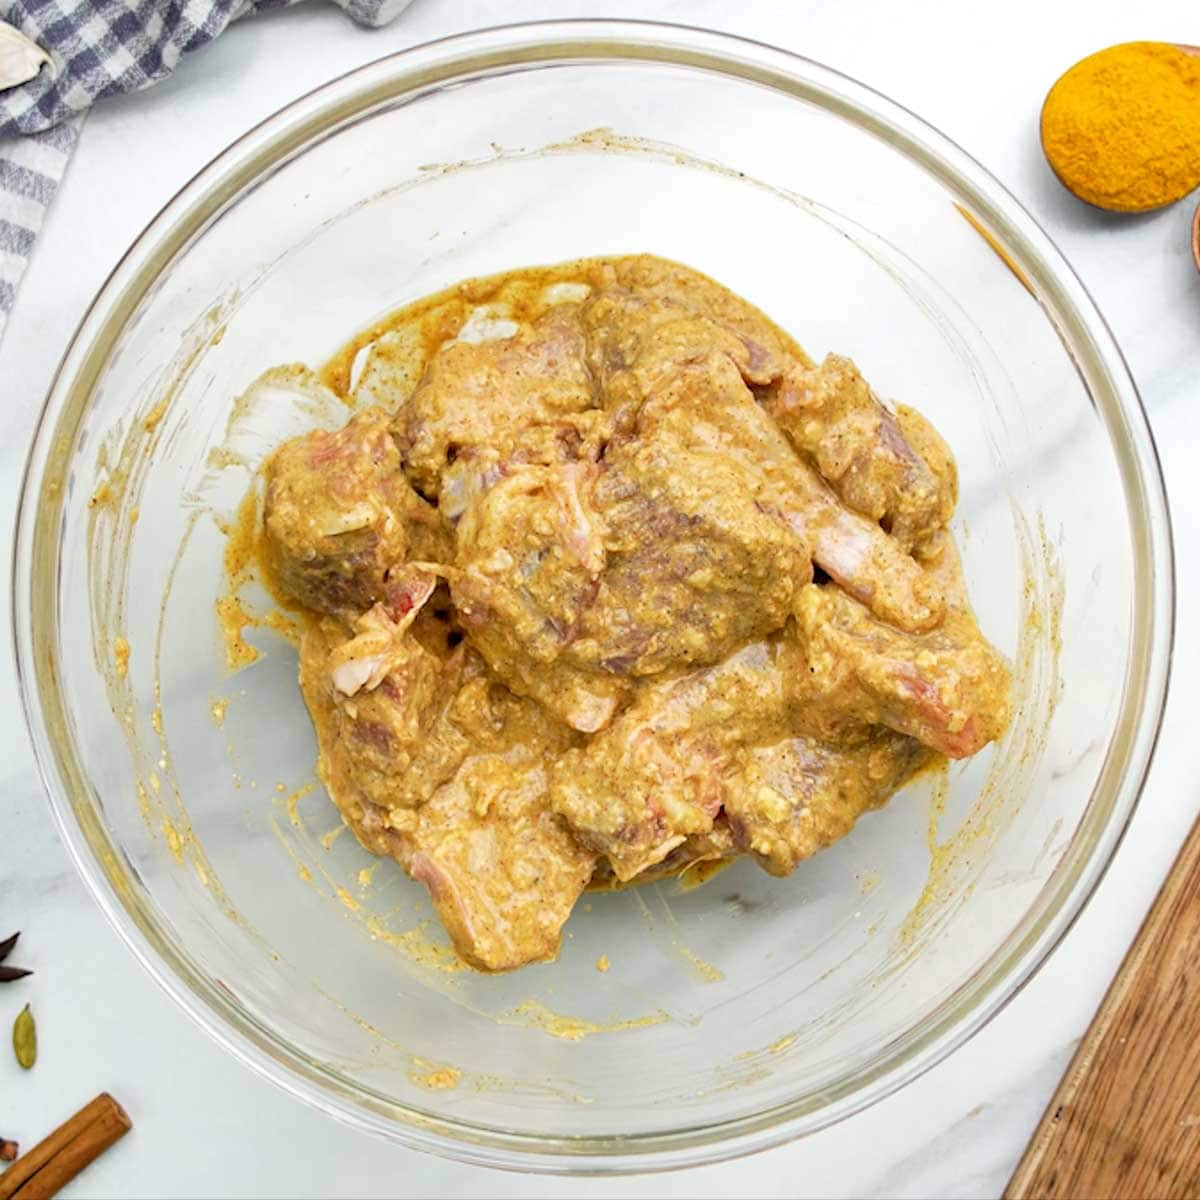
Marinate the Mutton
- In a large bowl, add all marinade ingredients, such as yogurt, ginger, garlic, salt, and spices.

- Add the mutton pieces to the bowl and mix well with the marinade. Make sure the mutton pieces are already cut into smaller pieces.
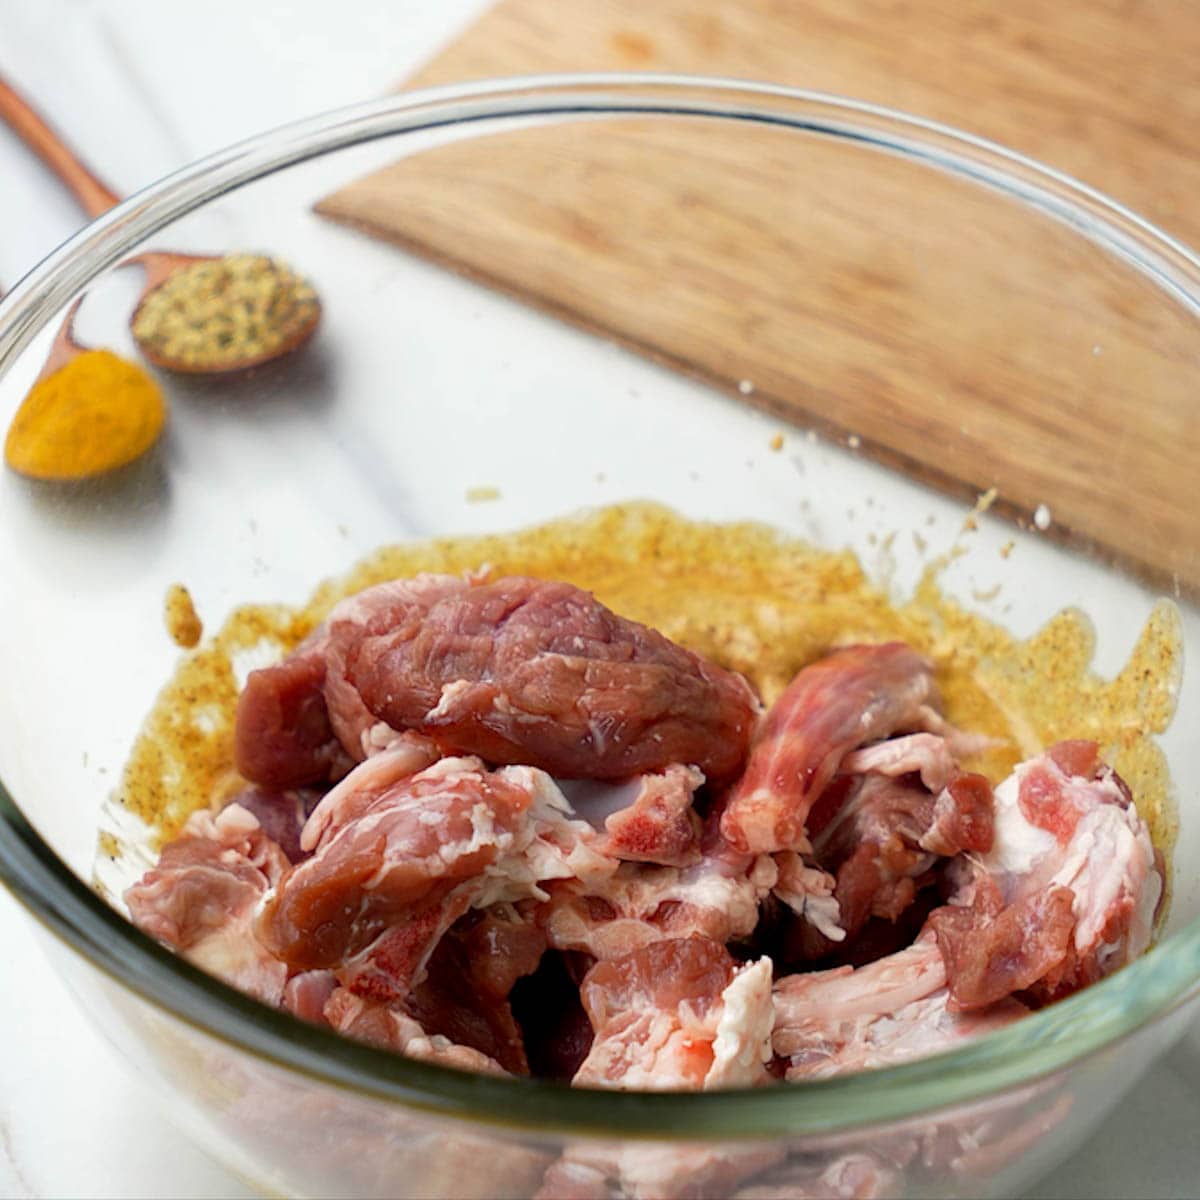
- Cover and let it sit in the fridge for at least 1 hour. Overnight is even better (up to 10 hours is perfectly fine!).
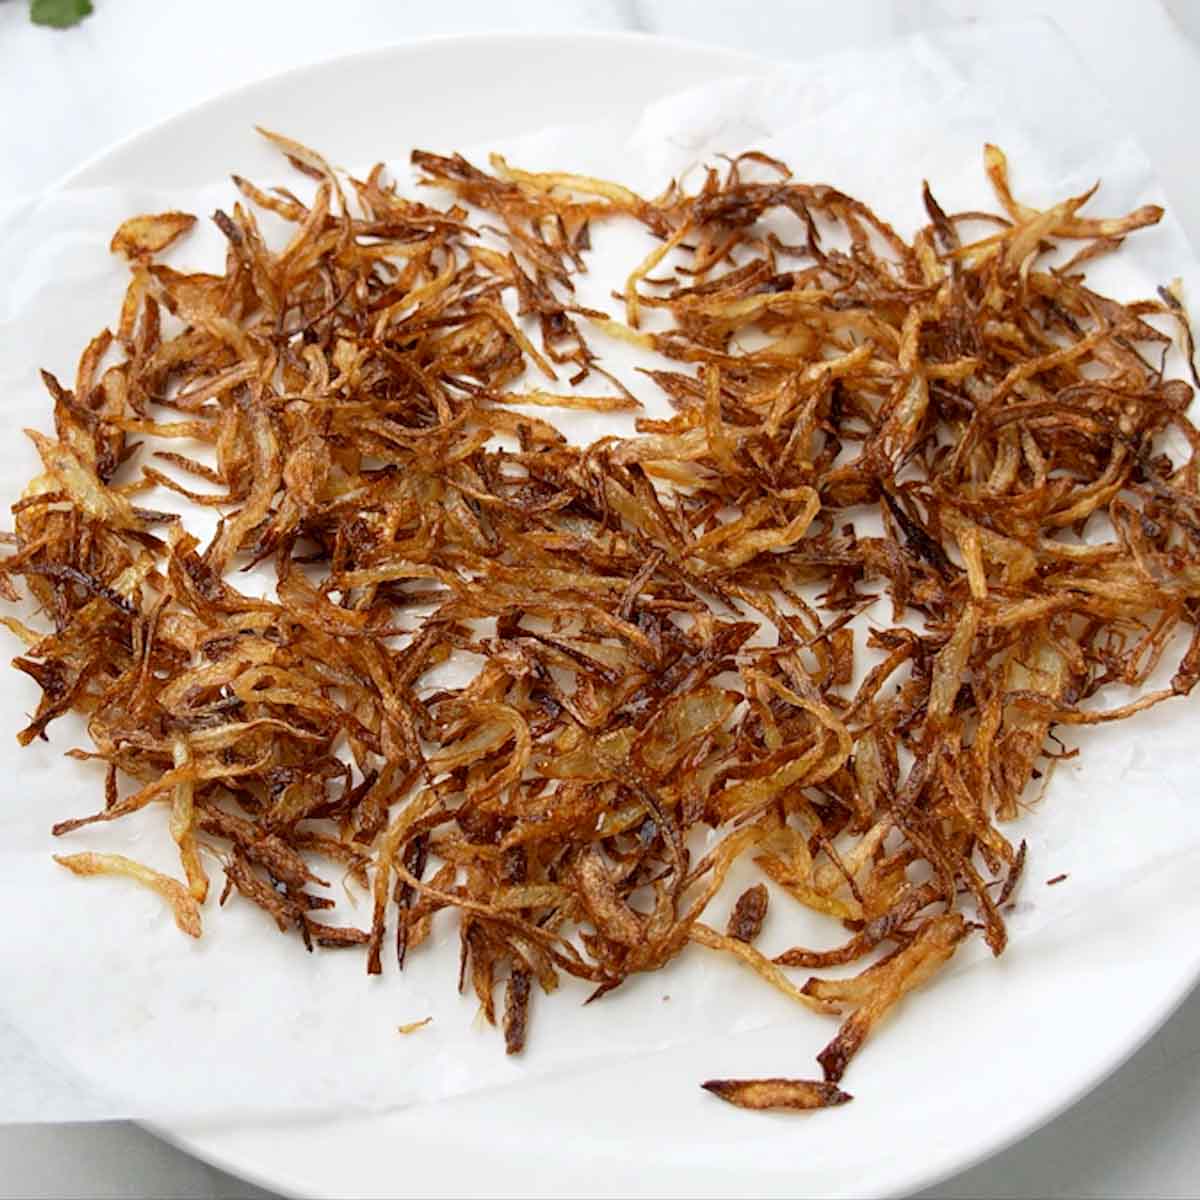
Prepare Fried Onions (Birista)
Here is the detailed recipe to make crispy fried onions.
- Heat some oil in a pan.
- Slice up an onion and add it to the hot oil.
- Fry the onions until they turn a beautiful golden brown. This might take 10-15 minutes, so don’t rush it!
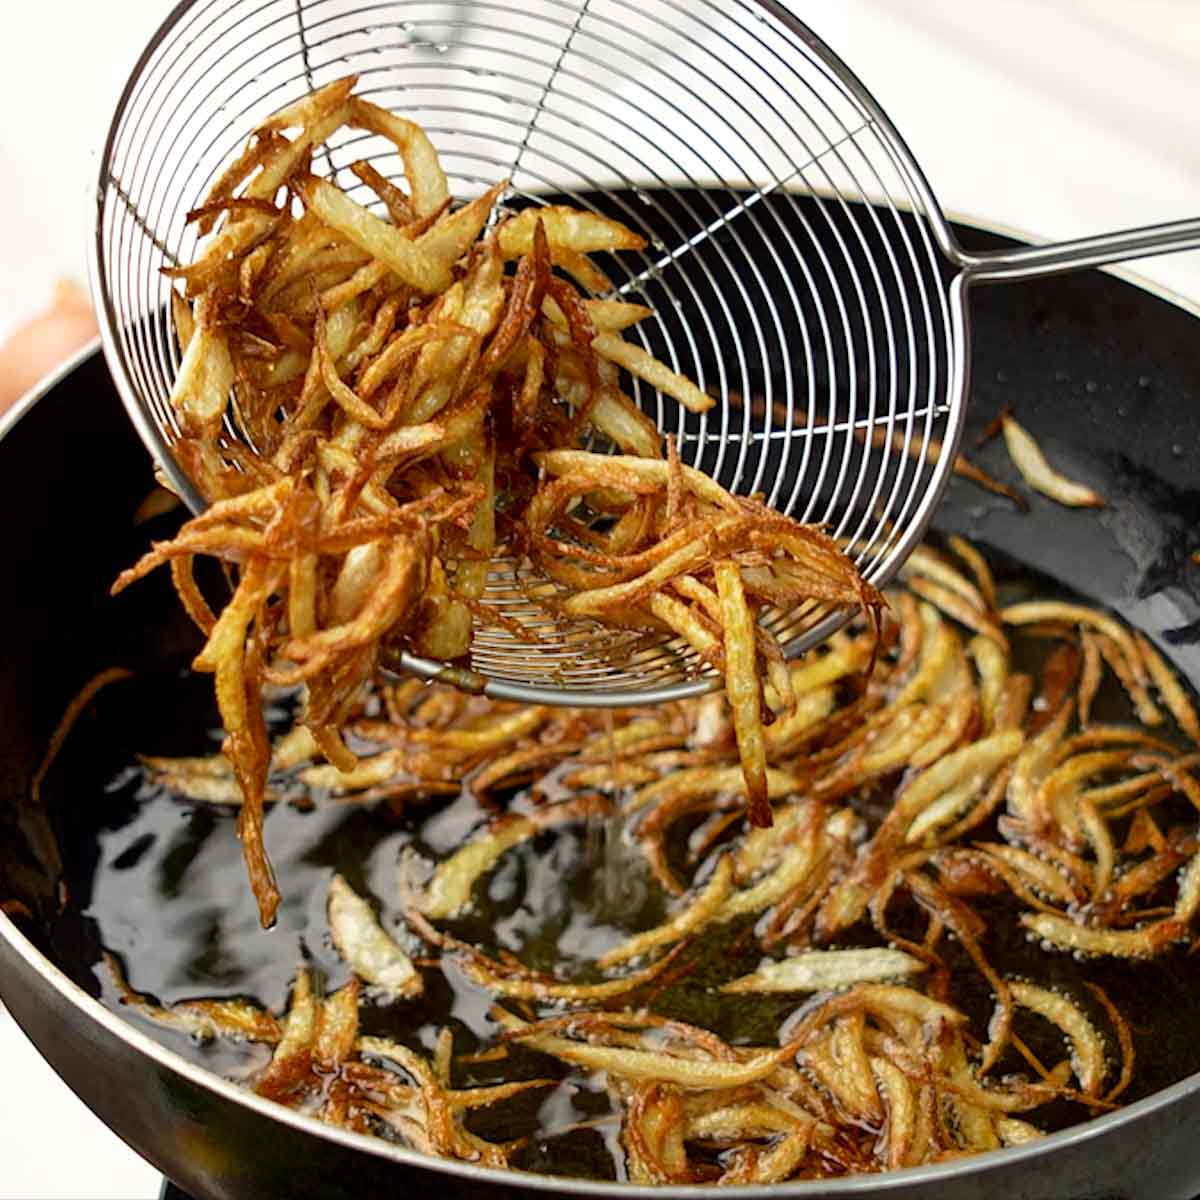
- Once golden, remove the onions from the pan and drain any oil on a paper towel-lined plate.
Pro-Tip: Feeling short on time? No worries! You can use store-bought fried onions instead. Here’s a secret: Look for them at Indian grocery stores. They often have fried onions with a more authentic taste than you might find at regular supermarkets. Some regular stores might have “French fried onions,” but these are coated in flour before frying, which gives them a different texture.
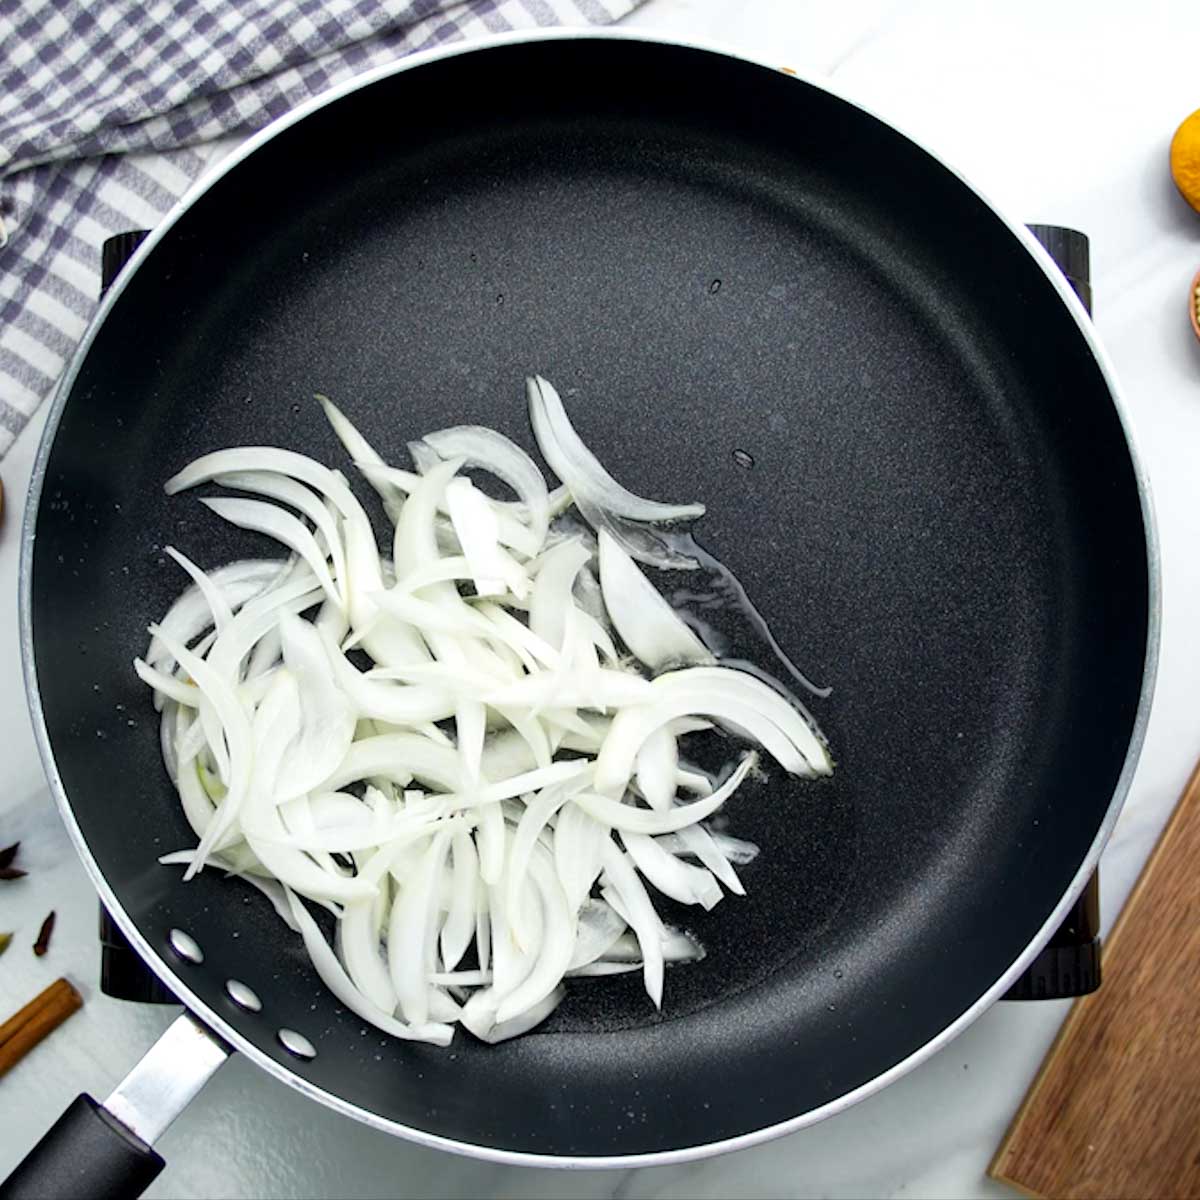
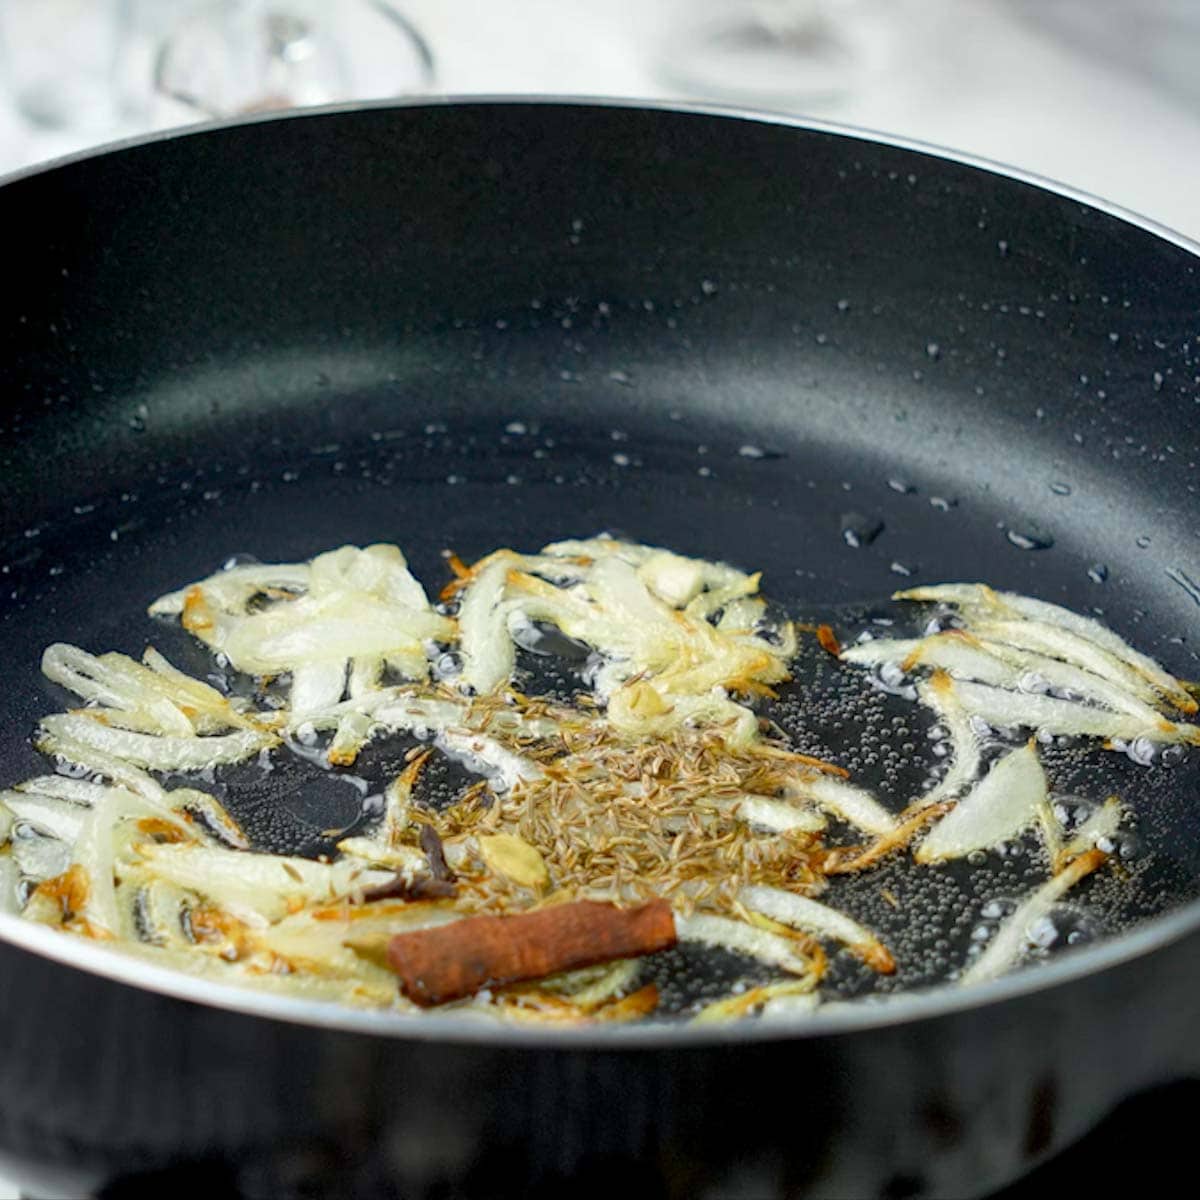
Making Mutton Masala
- Heat oil and ghee in a large pan. We will use the same pan to layer the biryani.
- Add in the sliced onions and cook them until they turn golden brown.
- Add the cinnamon stick, cloves, cardamom pods, and cumin seeds. Let them sizzle for about 30 seconds.
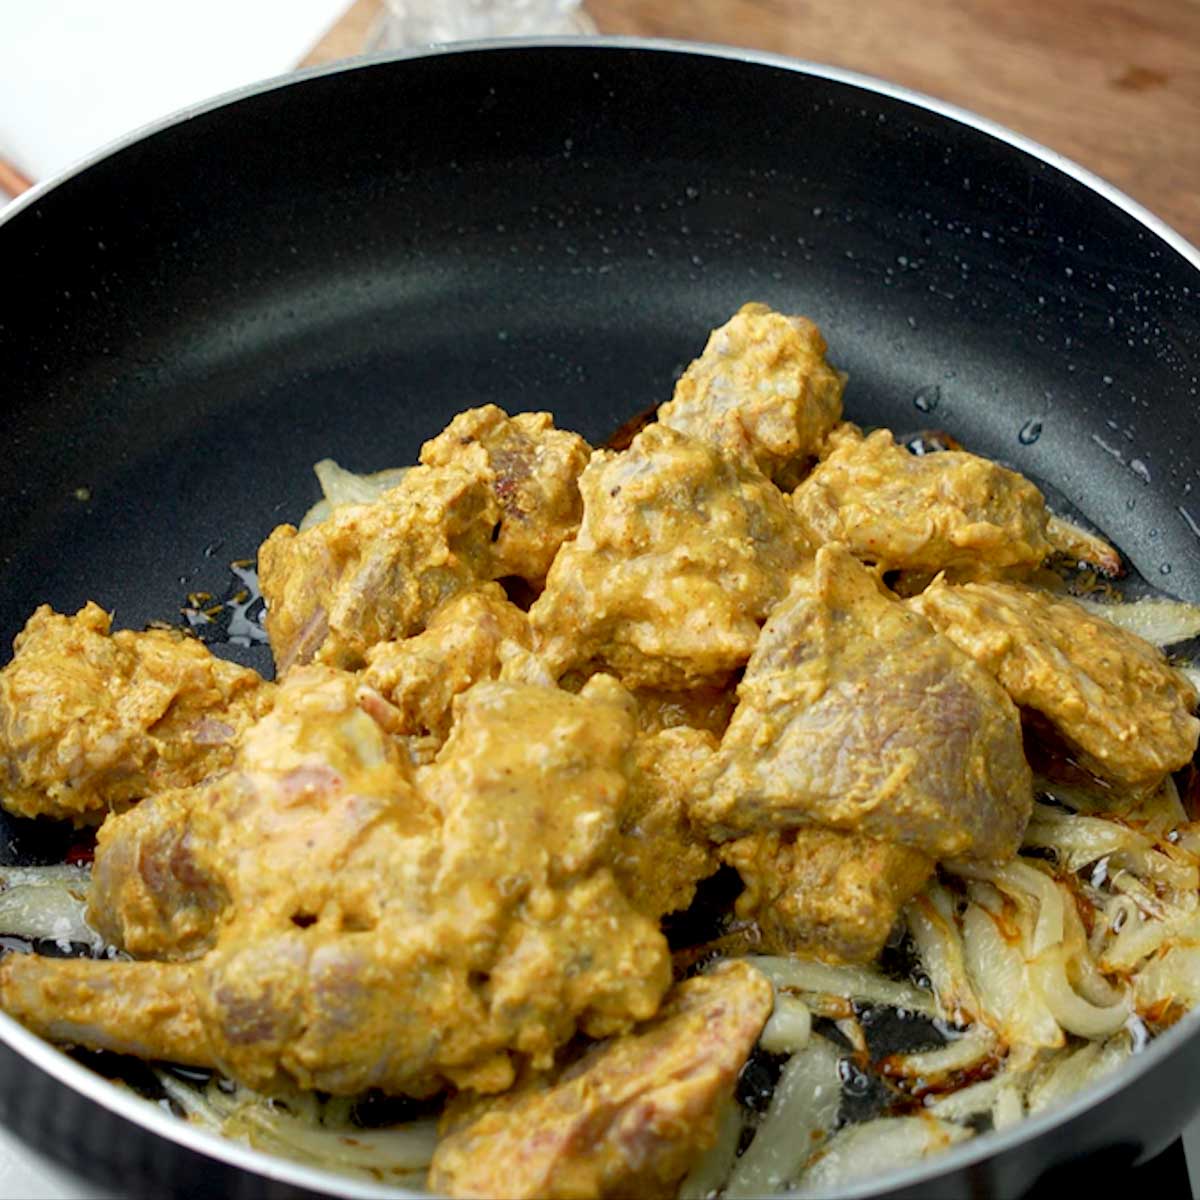
- Now add the marinated mutton and mix everything. Cook for about 5-6 minutes, stirring continuously. This is important so the yogurt does not separate.
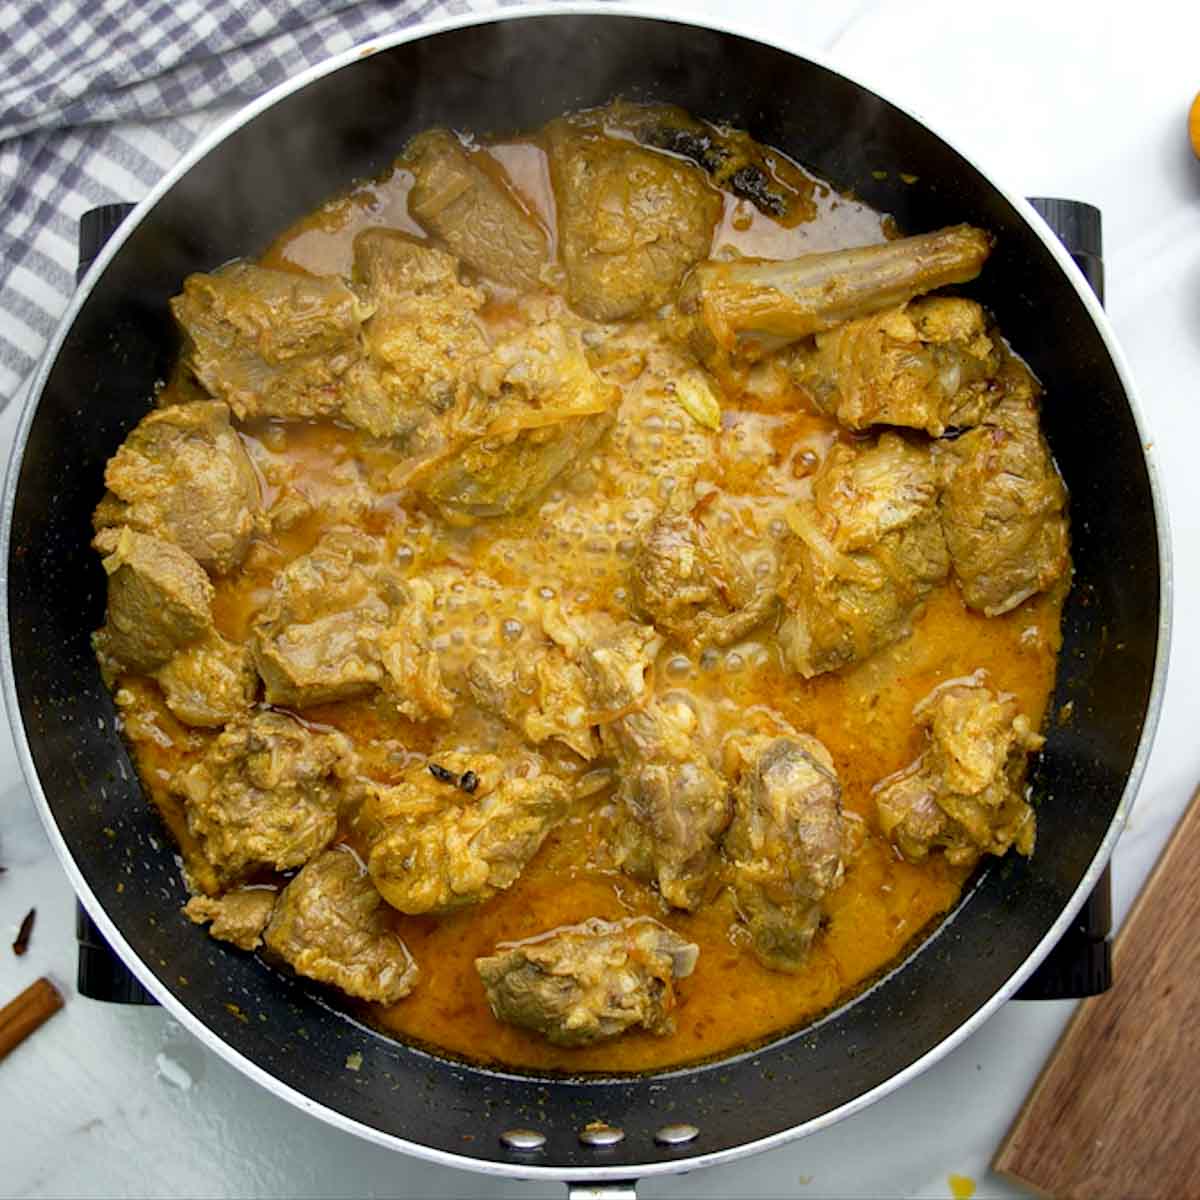
- Pour in some water, cover the pan, and cook for 60-80 minutes on low heat until the mutton becomes tender. Make sure to stir in between at regular intervals and if the liquid is all dried up, then add a little water. Remember, you want the meat to be tender but not falling apart. Also, we want a thick mutton masala, not a thin, soupy consistency, so don’t add too much water.
Pro-Tip: If you like to make the mutton masala quicker, you can cook it in a pressure cooker for 3-4 whistles or about 20 minutes in the instant pot.
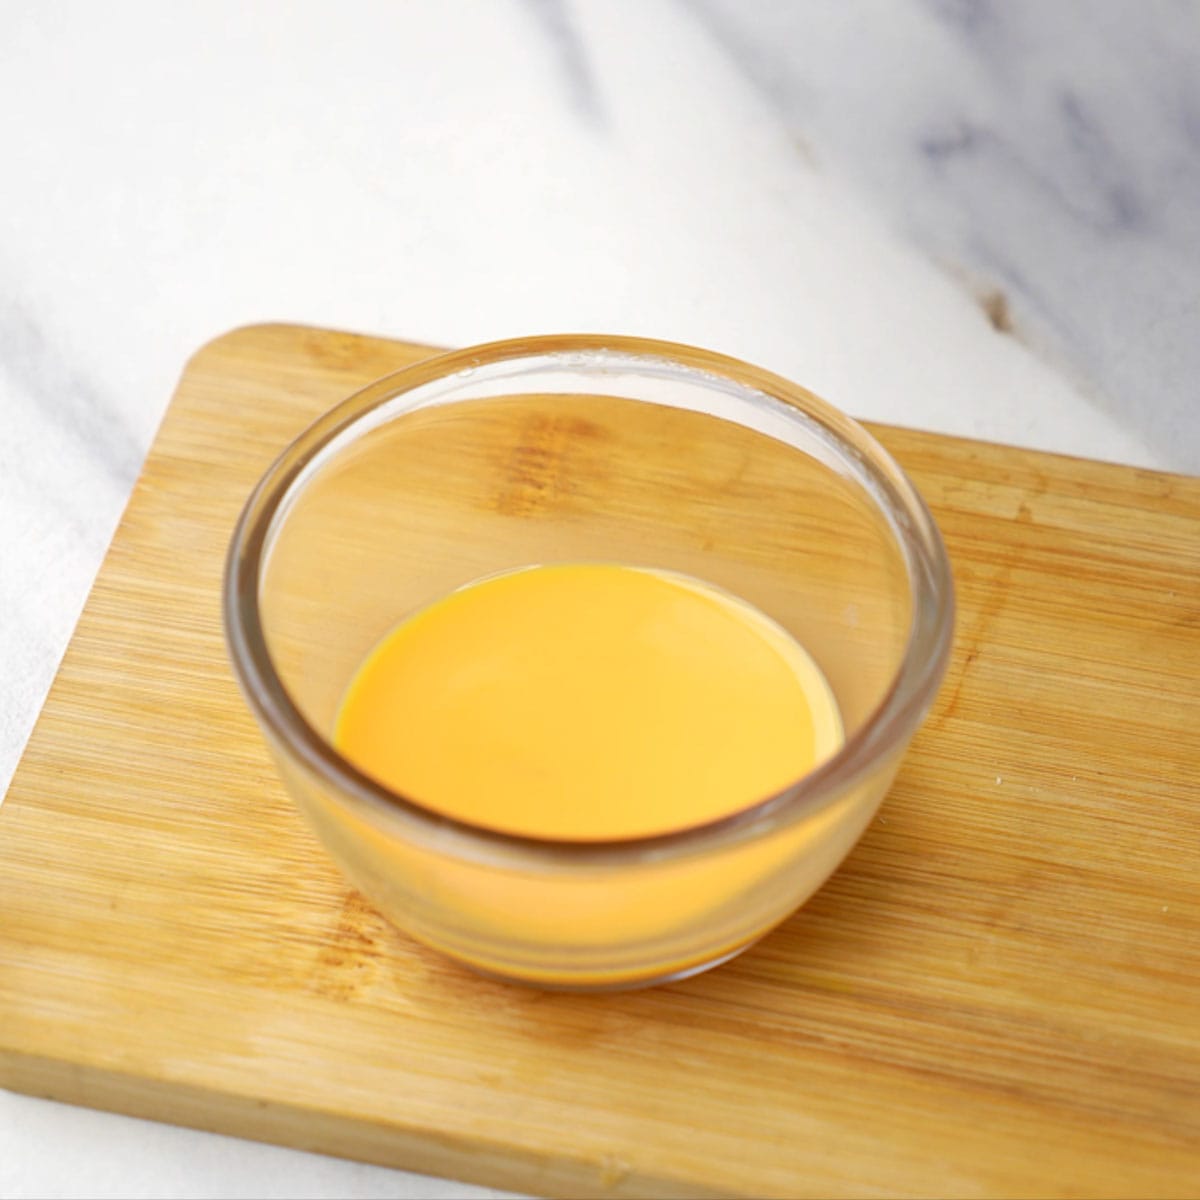
Soak Saffron
- Mix some saffron strands in warm milk and let it sit for 10 minutes.
Parboiled Rice
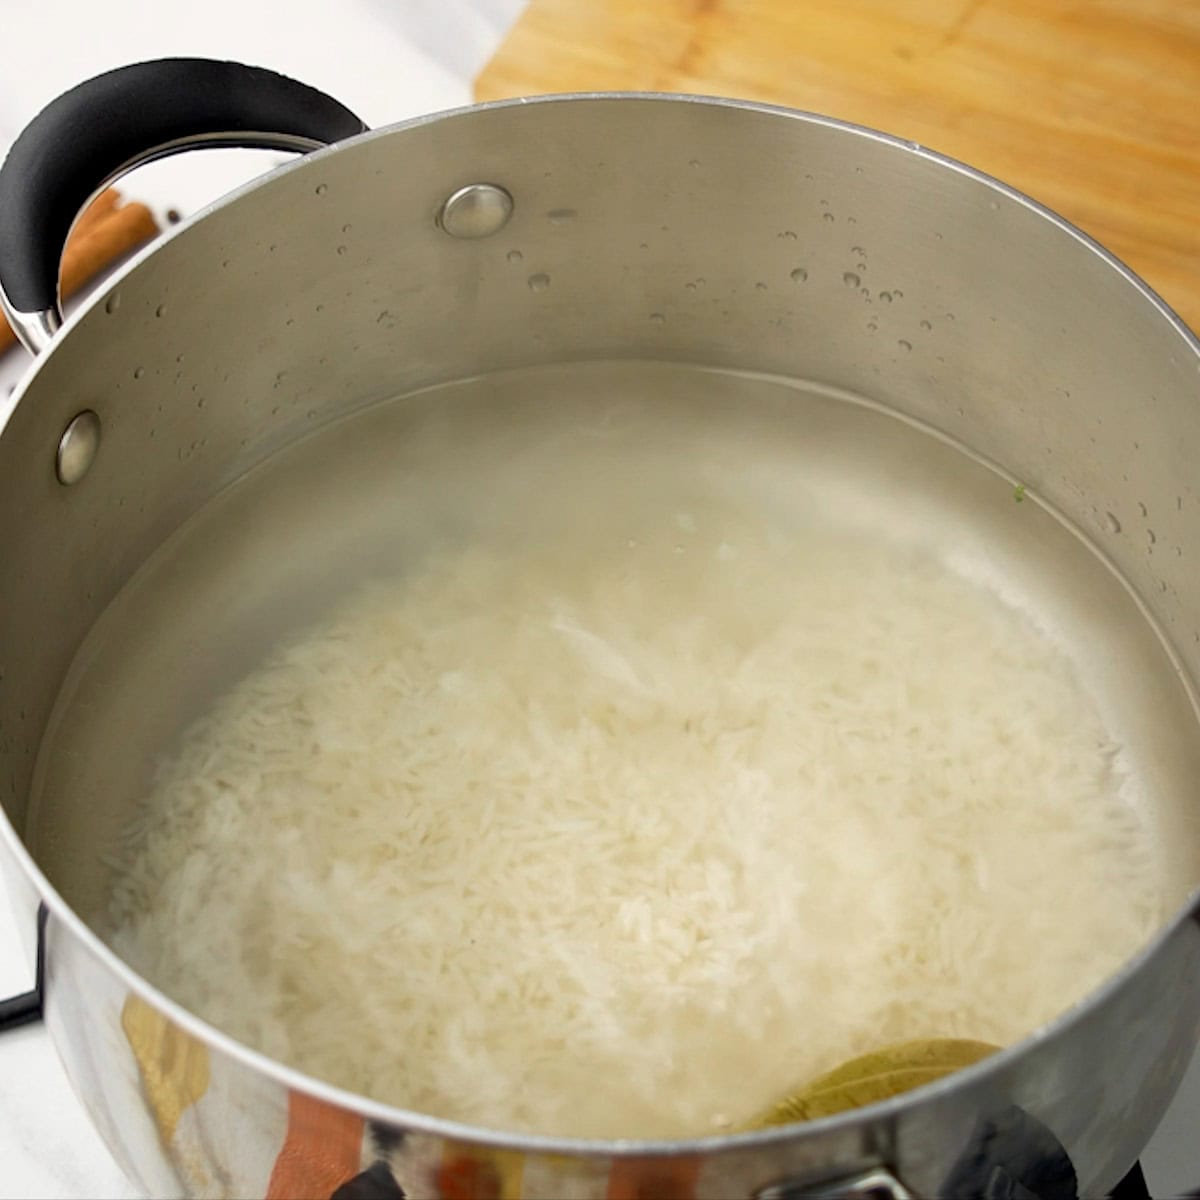
- Bring a large pot of water to a boil. Add salt, whole spices (bay leaf, cloves, cardamom), and the basmati rice. Cook for 5 minutes, then drain the water right away. The rice should be about 70% cooked at this point. Don’t overcook it!
Layering and Cooking Biryani
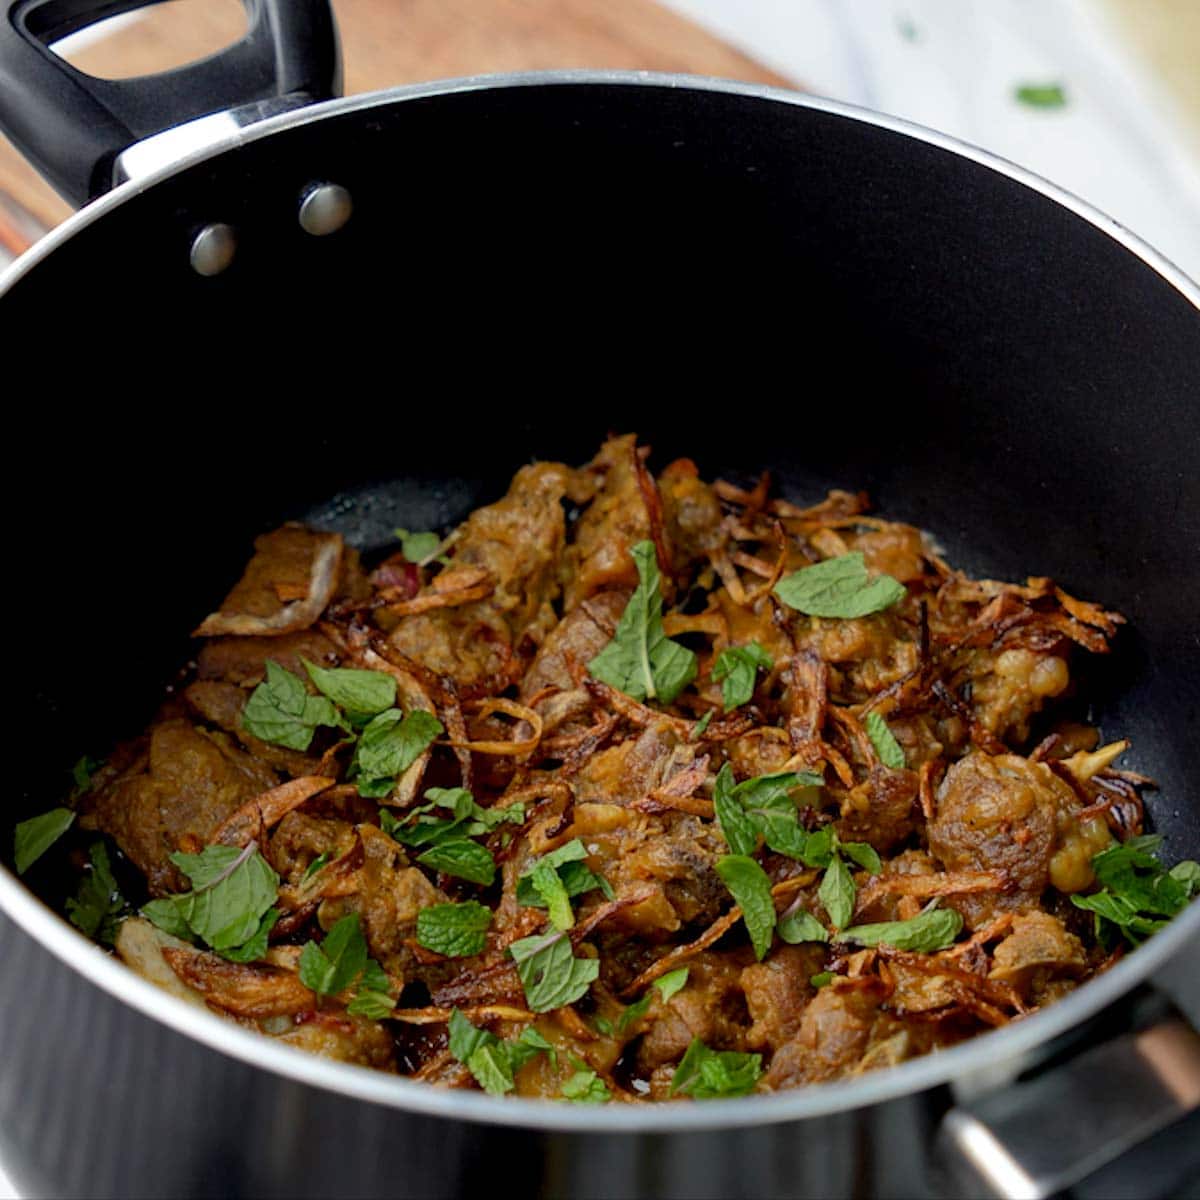
- Take the cooked mutton off the heat. Spread half of the fried onions, mint leaves, and cilantro leaves over it.
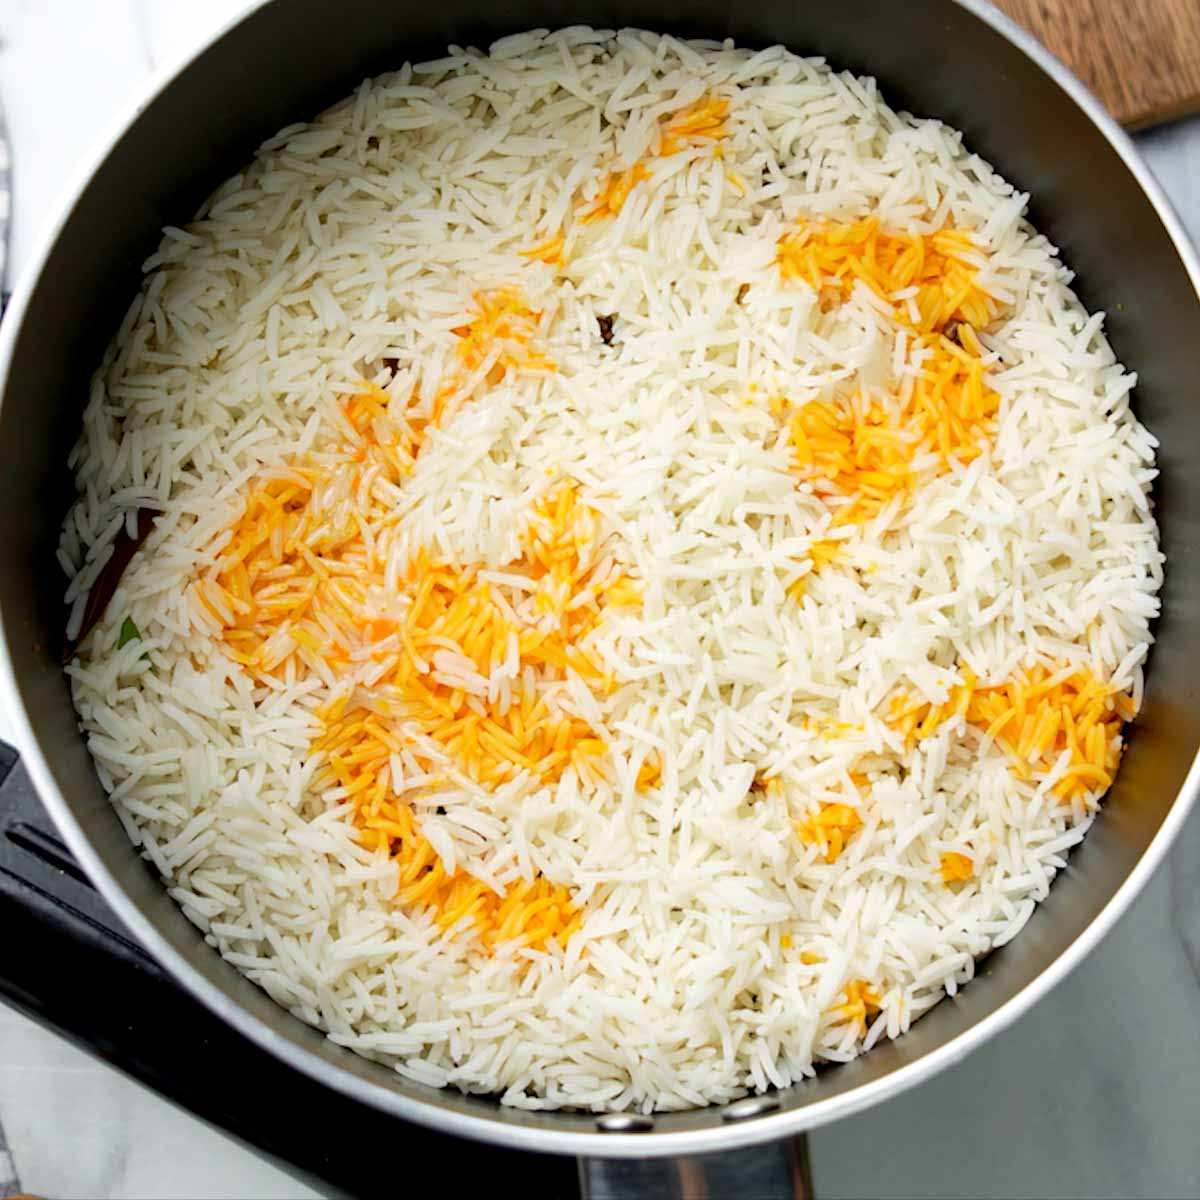
- Layer the partially cooked rice evenly on top.
- Drizzle melted ghee and saffron milk over the rice.
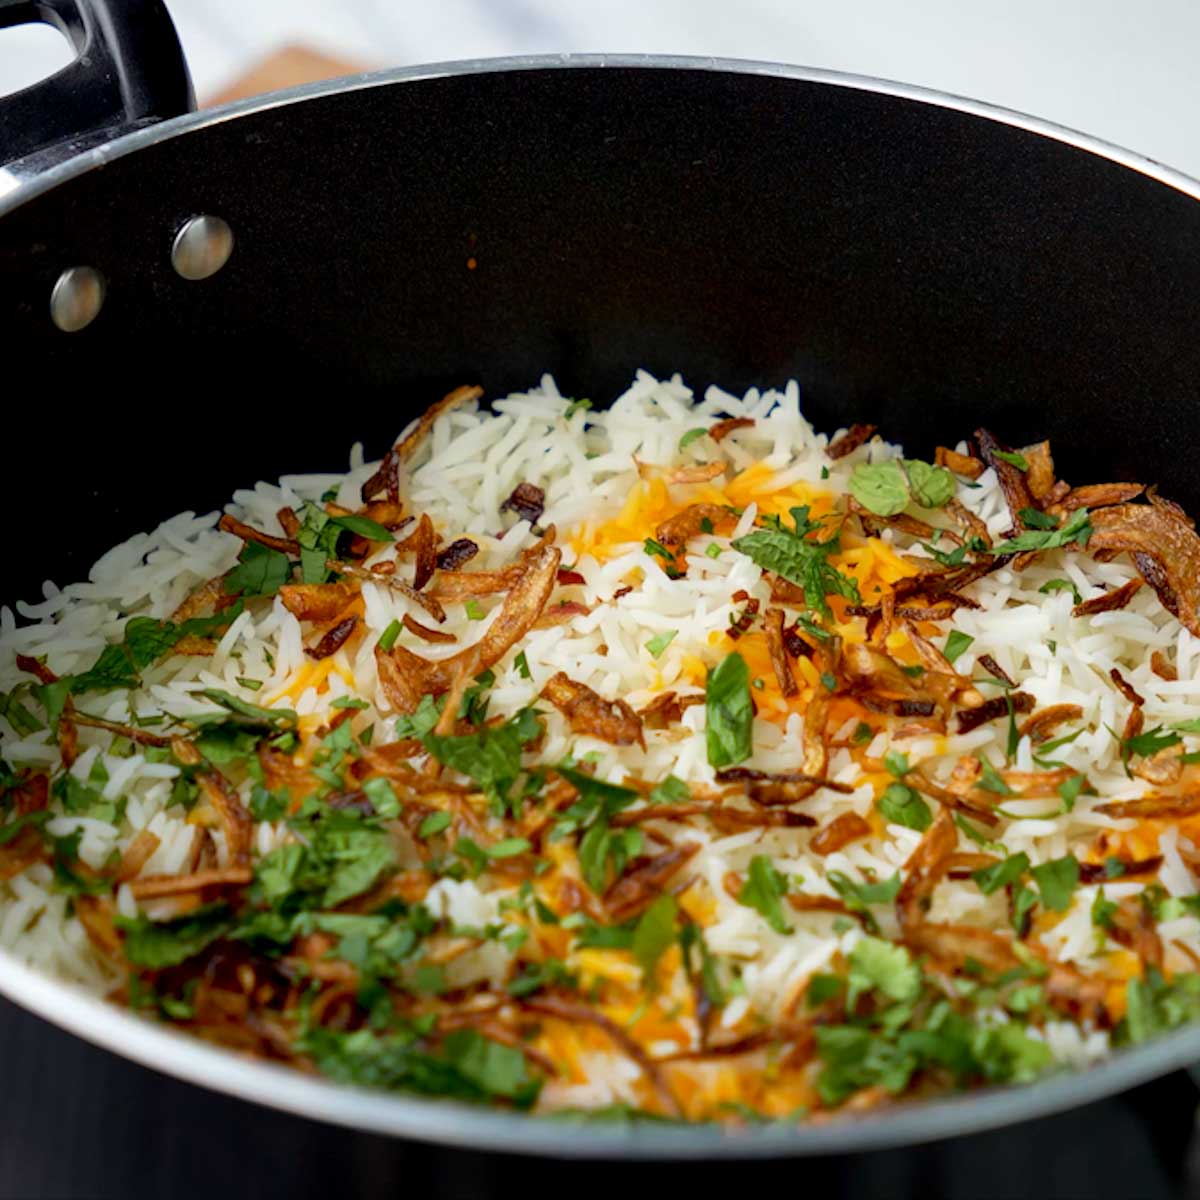
- Then, add the remaining fried onions, mint leaves, and cilantro leaves.
- Cover the pot tightly and cook on low heat for 20 minutes. To keep the steam in, put a kitchen towel over the lid.
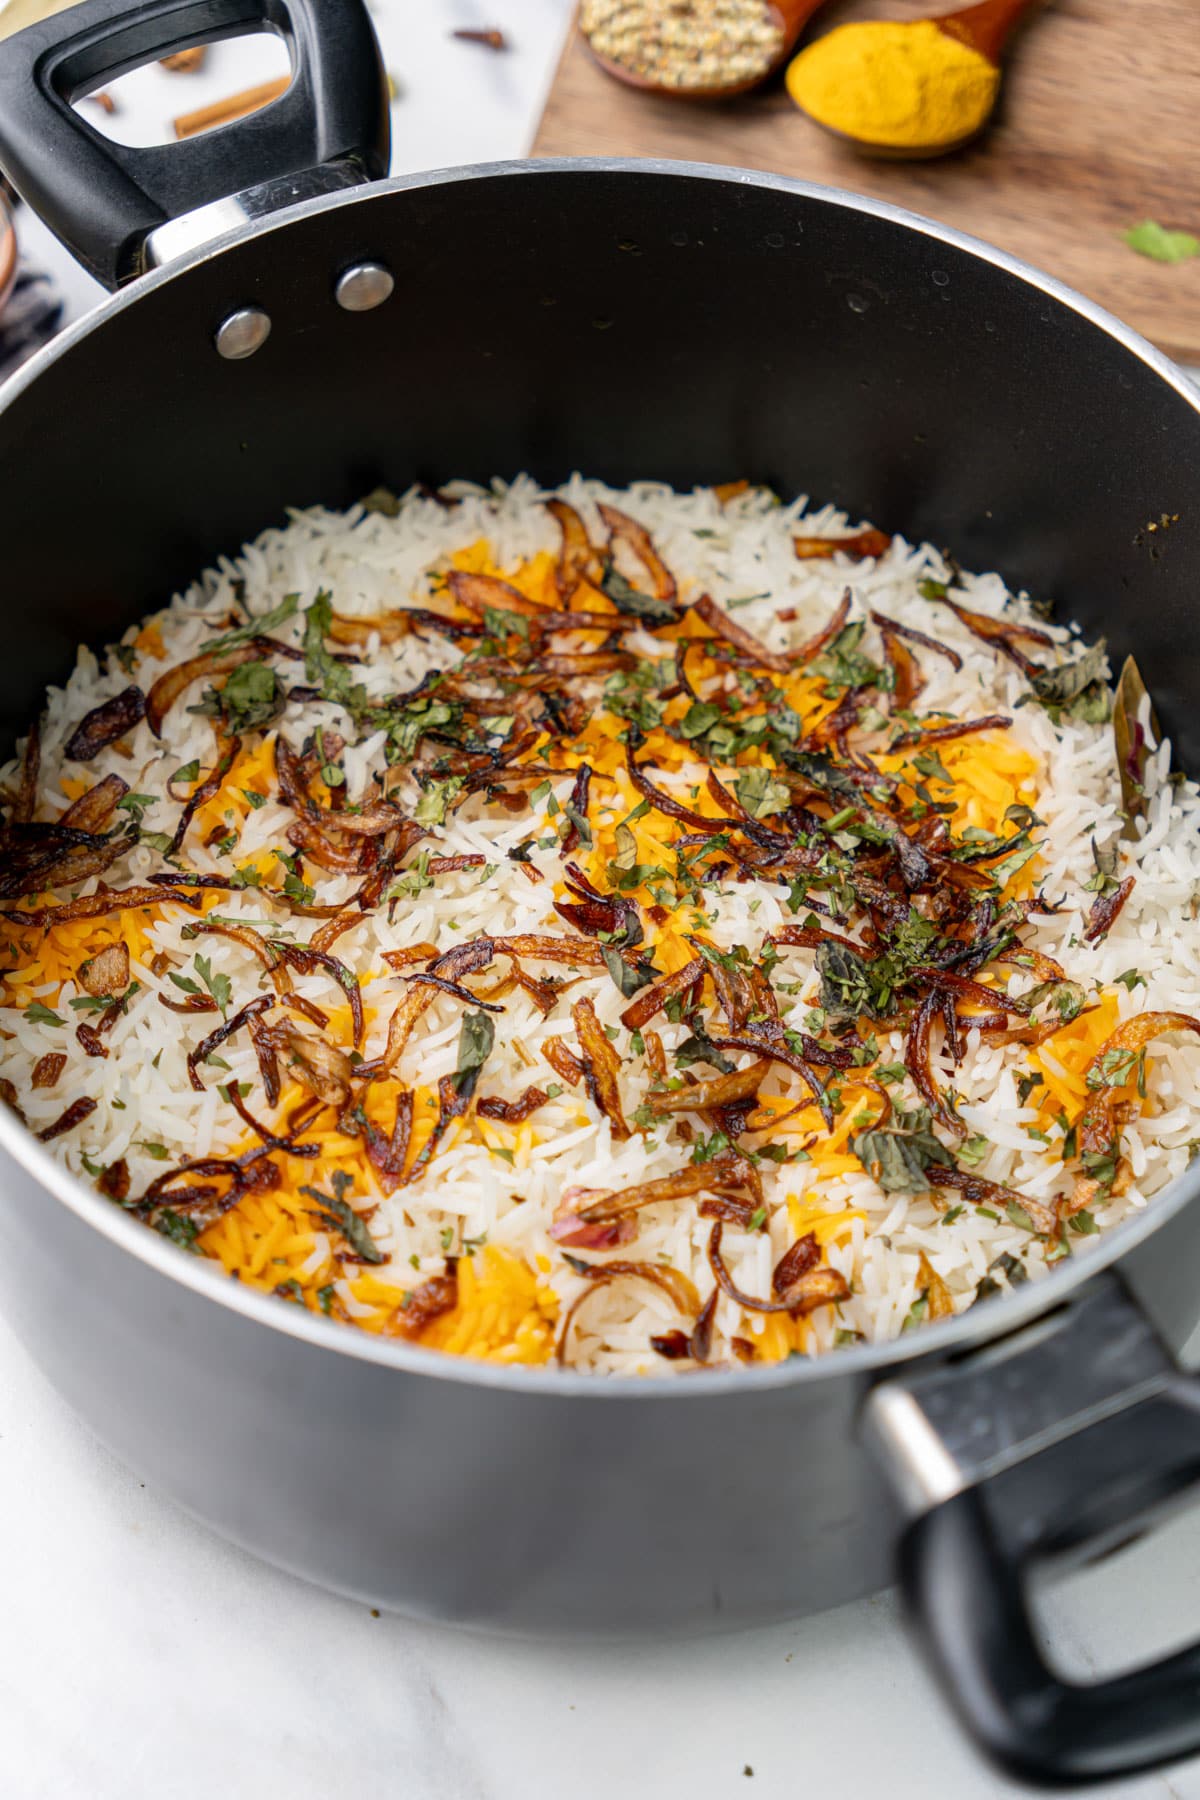
- Let it sit for a few minutes after cooking.
Serving Biryani
- When serving, dig deep in the pot and scoop up all the layers of rice and mutton together.
- Add some fried onions and cilantro leaves on top.
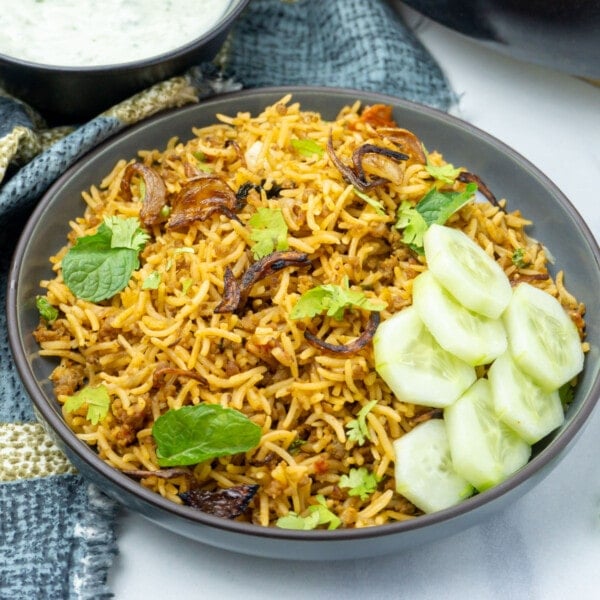
- Serve it with a raita or a simple kachumber salad.
Recipe Tips
Mutton: For this biryani, I recommend using bone-in mutton or lamb pieces. Use shoulder meat (or leg cuts), which is juicier and has fat.
Fried Onions: This is the most tedious part of the recipe. You can fry and store the onions ahead of time in an airtight container in the refrigerator. You can substitute with store-bought onions or shallots if you like. Be sure to get gluten-free ones that are not mixed with other ingredients before frying.
Basmati Rice: I like to cook biryani using premium extra long-grain basmati rice. If you use other rice, the biryani will not be as fragrant.
Cooking Biryani: Seal the pot tightly for steaming (dum) to create fluffy rice. If you don’t have a heavy-bottom pan, place a tawa or griddle below the pan with biryani. This helps to diffuse the heat and ensures the bottom layer of biryani is not overcooked or burnt. You will need to turn up the heat to medium.
Make it Spicier: This recipe is family-friendly and not very spicy. Increase the amount of red chili powder or add a couple of diced green chilies to the mutton masala to make it spicier.
Storing leftovers: You can store leftovers in the refrigerator in an airtight container for up to 3 days. This biryani will also freeze well. Thaw it overnight in the refrigerator before reheating it in the microwave.
Double the recipe: Doubling the recipe can save you time in the kitchen and is also great for packing for lunch.
More Rice Recipes You’ll Love

Easy Instant Pot Rice & Beans
Keema Rice (One-pot Keema Biryani)
Chana Pulao (Easy Chickpea Rice)
Pressure Cooker Coconut Rice (with pot-in-pot option)

Mutton Biryani
Video
Ingredients
- 1.1 pound Mutton (Goat Meat) or Lamb, bone-in, cut into small pieces (500 grams)
Marinade
- 1/2 cup Plain Yogurt, thick full-fat, or hung curd
- 4 cloves Garlic , minced
- 2 teaspoon Ginger, freshly grated
- 2 teaspoon Kashmiri red chili powder, mild, or use 1 teaspoon paprika and 1/2 teaspoon cayenne. Add more for spicier biryani.
- 1/2 teaspoon Turmeric powder (Haldi)
- 1 teaspoon Coriander powder (Dhaniya powder)
- 1 teaspoon Garam Masala
- 1 teaspoon Salt
- 2 teaspoon Lime or Lemon juice
Saffron
- 2 tablespoon Warm Milk
- 10-12 strands Saffron (Kesar)
Parboiled Rice
- 1 1/2 cups Basmati Rice , rinsed and soaked in water for 20 minutes
- 6 cups Water
- 1 1/2 tablespoon Salt
- 1 Bay leaf (Tej Patta)
- 4 Cloves (Laung)
- 4 Green Cardamom (Elaichi)
- 1 Star anaise
Mutton Masala
- 2 tablespoon Oil
- 1 tablespoon Ghee
- 1 Yellow Onion, about 250 grams, peeled and thinly sliced
- 1 inch stick Cinnamon (Dalchini)
- 4 Cloves (Laung)
- 3 pods Green Cardamom (Elaichi)
- 1/2 teaspoon Cumin seeds (Jeera)
- 1/2 cup Water
Biryani
- 1 tablespoon Ghee , melted
- 1/3 cup Golden fried onions (Birista)
- 1/2 cup Mint leaves (Pudhina), fresh, chopped
- 1/2 cup Cilantro leaves (Corainder), chopped
For Serving
Instructions
Marinate Mutton
- In a bowl, mix all ingredients under the marinade section. Then, add the mutton pieces and mix well. Marinate for at least 1 hour or overnight for up to 10 hours for best results.
Mutton Masala
- Heat oil and ghee in a large heavy-bottom pan or Dutch oven over medium-high heat. Add the onions and shallow fry for 10-11 minutes till they are golden brown. (Note: You can also use a pressure cooker to make the mutton masala)
- Add the whole spices – cinnamon, cloves, cardamom, and cumin seeds. Saute for 30 seconds so their aroma releases.
- Add the marinated mutton to the pan and mix everything well. Cook the mutton for 5-6 minutes, stirring frequently.
- Add water and stir it with the mutton. Reduce heat to low, cover with lid, and cook for 60-80 minutes, stirring occasionally, until the mutton is tender. (If using a pressure cooker, cook for 3-4 whistles or about 20 minutes). The cooked mutton should be tender but not falling apart. Make sure to stir at regular intervals, and if the liquid has completely dried, add a little water as needed.While mutton is cooking, continue with the below steps for saffron and rice.
Saffron
- Soak saffron strands in warm milk. Set this aside for 10 minutes.
Parboiled Rice
- Add water to a large pot and bring it to a rolling boil. Add salt, whole spices, and basmati rice (after draining the soaking water). Cook for 5 minutes, then drain the water immediately. The rice will be about 70% done at this stage. Don't overcook the rice. Check by taking a grain between your fingers; it should break easily but is still not completely done at the center.
Layer and Cook Biryani
- Remove the cooked mutton from the heat. Spread half of the fried onions on top of the mutton. Spread half of the chopped mint leaves, and cilantro leaves over the mutton.
- Now, layer the parboiled rice evenly on top. Using a spatula, flat the surface. Now, drizzle the melted ghee and saffron milk all over the rice. Spread the remaining fried onions, mint leaves, and cilantro leaves on top.
- Cover with a tight lid and cook on the lowest flame for 20 minutes. You can also wrap a kitchen towel on the lid to get that tight-fitting lid to keep the steam inside while cooking the biryani. This process is called "dum" which is basically cooking on low heat. (See notes)
- Remove from heat and let the biryani rest for 5-10 minutes. Garnish with chopped cilantro leaves.
- When serving, dig deep to get all the layers with the yellow rice, white rice, and mutton in one scoop. Garnish with fried onions and cilantro leaves. Serve with raita and salad!


Delicious
Sounds like a good recipe. This is how I make too learning from my mother in law. Your recipes are great!
Hi – So good to hear that. 🙂