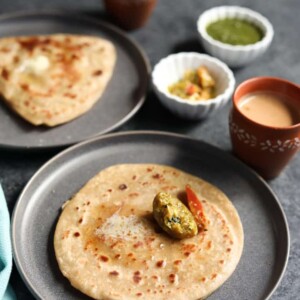
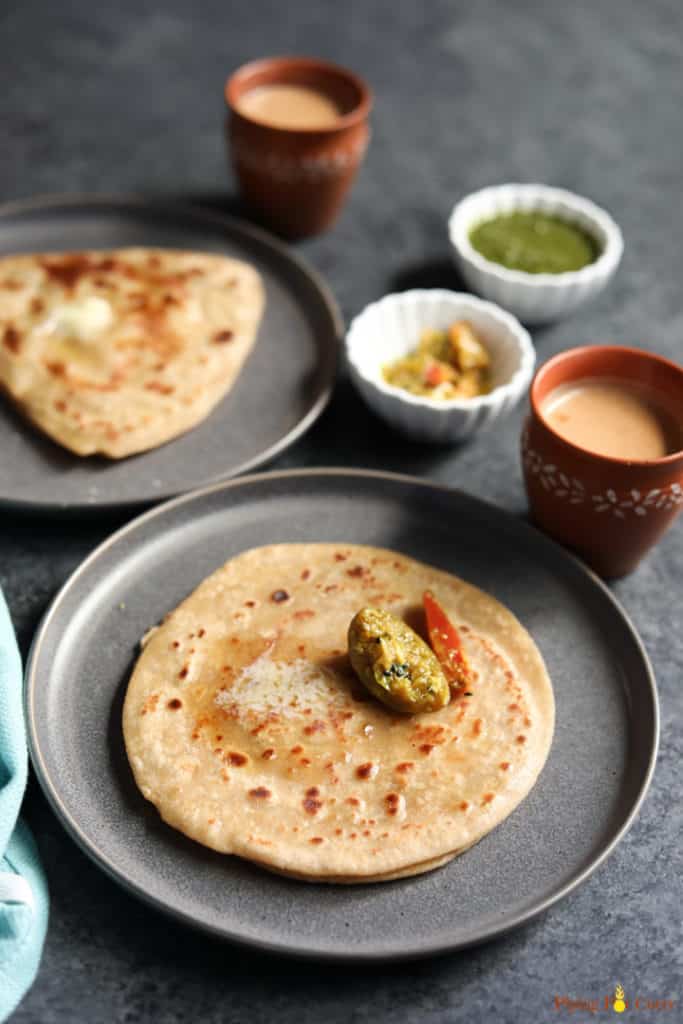
Parathas are one of the most popular unleavened flatbreads from India. Parathas are made using whole wheat flour by layering and rolling the dough and then cooking it on the griddle with ghee or oil.
They are enjoyed with pickle and a hot cup of chai for breakfast or alongside curry and yogurt raita for lunch or dinner. Learn how to make perfect parathas every time!
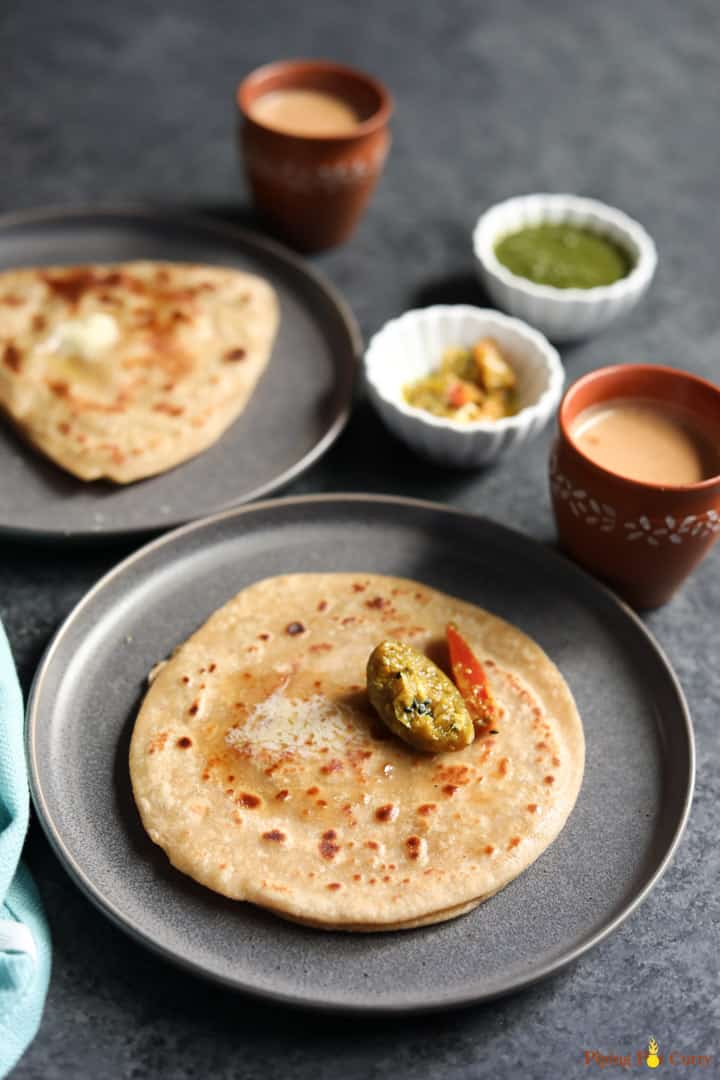
I recently shared the recipe for roti/chapati, one of the most popular Indian flatbreads enjoyed for lunch or dinner. If I have to say the next most popular flatbread in Indian cuisine, it would definitely be Paratha.
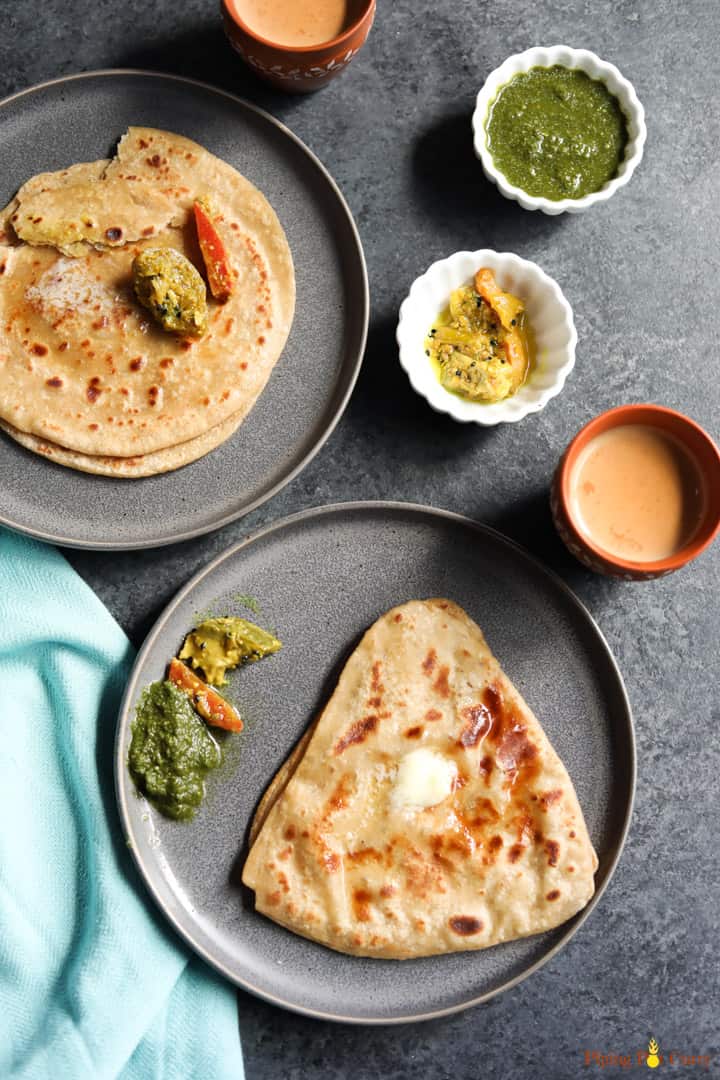
Parathas can be made plain, spiced, or stuffed with veggies, paneer, or even with minced meat. In this recipe, I will share step-by-step how to make plain parathas in 3 shapes – round, square, and triangle.
When I would visit my grandparents in North India every year as a kid, my favorite breakfast would be paratha, topped with lots of butter and tangy, spicy anardana masala (pomegranate powder). Elders would enjoy this with chai, and kids with a cup of warm milk.
Some days, it would be aloo paratha. Another day, gobi paratha or methi paratha, or mooli paratha, and yet another time, paneer paratha. Now, we also love to make broccoli paratha.
Parathas are also great to pack in tiffin for lunch, especially for toddlers and kids. They keep soft for longer. I usually cut the paratha into eight pieces, similar to a pizza for my daughter. This makes it easy for her to enjoy parathas as finger food during lunch.
Table of Contents
- Watch How to Make Paratha (Pan-fried Indian flatbread)
- What is Paratha?
- Is Paratha Vegan?
- Which flour is best to make Paratha?
- How to make paratha dough?
- How to roll parathas?
- How to cook soft and flaky parathas?
- Tips for soft and flaky paratha
- How to store Paratha and dough?
- How to reheat paratha?
- How to pack paratha for lunch in a box?
- Paratha Recipe (Pan-fried Indian flatbread) Recipe
Watch How to Make Paratha (Pan-fried Indian flatbread)
What is Paratha?
A paratha (parāṇṭhā) is a flatbread that originated in the Indian subcontinent. Parathas are one of the most popular unleavened flatbreads in India.
Plain parathas are made with whole wheat flour that is kneaded using salt, oil, and water. The dough is then rolled into a layered flatbread, cooked on a tawa (griddle), and finished with shallow frying with ghee or oil until golden brown spots are on both sides.
Parathas are thicker and more substantial than roti/chapati. This is because they have been layered by coating with ghee or oil and folding (similar to the method used for puff pastry) or stuffing veggies or meat in the dough. Usually, the paratha is eaten with dollops of white butter or ghee on top of it.
In North Indian or Punjabi parathas, we apply ghee or oil before layering the paratha. You could also call this ghee paratha.
Sometimes, we add some Ajwain (Carom seeds), along with the ghee, to make Ajwain paratha. Ajwain is a great addition to paratha as it helps with digestion and is rich in fiber, minerals, and vitamins.
You can add salt and or red chili powder (or other spices) when applying ghee to the paratha. Depending on who you are making it for, I make the paratha with spices or just plain. For my daughter, I add lots of ghee and add salt. For myself, some ghee, salt, and red chili powder. You may call this Masala Paratha.
Is Paratha Vegan?
It is made with whole wheat flour, water, salt, and oil. Simply replace the ghee in the recipe with your favorite vegetable oil.
Which flour is best to make Paratha?
After trying many whole wheat flours from Indian grocery stores, I prefer Sujata Chakki Atta or Aashirvaad Select Sharbati Atta or Aashirvaad Whole Wheat Atta.
I have also tried to make whole wheat flour at home from wheat berries using a grain mill (Nutrimill), and it works great to use the flour for making paratha. It is a bit more coarse than store-bought flour.
How to make paratha dough?
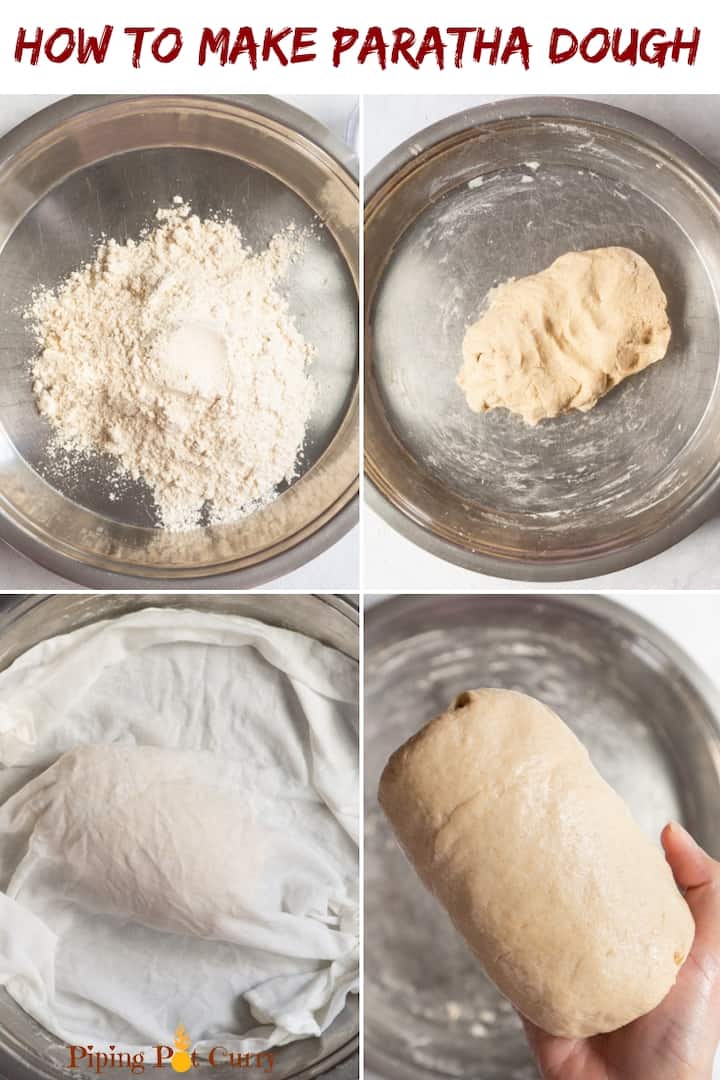
- In a large bowl or flat plate with high edges, take 2 cups of whole wheat flour. Add salt (optional).
- Slowly start adding water and mix with your hand. Do not add all the water at once. Keep adding water as needed while mixing the flour.
- Once the dough starts to form, do not add more water. I added more than 3/4 cup of water to make the dough. Note: The amount of water will vary depending on the brand of whole wheat flour.
- Make the dough smooth by kneading it with your fist. Add some water to your hand and knead. 2-3 times. When you press your finger against the dough, it should leave an impression. This is the right consistency for the dough.
- You can apply some oil to make the dough edges less sticky. But this is not necessary. The dough should be soft and not hard (hard is best for puri). The same dough for paratha can be used to make roti too.
- Cover with a damp cloth or plastic wrap and let it rest for at least 15 mins and up to 30 mins. This helps the gluten to release, and the dough becomes more elastic. Open and knead once again.
- Make balls from the dough by rotating between your palms. The balls will be the size of a golf ball, slightly larger in size than roti. Make the ball a bit flat.
To make dough using a mixer, check out my recipe to make roti/paratha dough using kitchenaid stand mixer.
Possible issues with paratha dough –
- If the dough gets too sticky, add a tablespoon of flour and knead again until all the flour is absorbed.
- If the dough gets too hard, it means less water is added. Add a tablespoon of water at a time and knead again. The dough should be soft enough that if you press your finger against the dough, it leaves an impression.
Check out the recipe to make Paratha Dough using an electric stand mixer.
How to roll parathas?
What do you need to make paratha?
- Marble or wood base (called chakla in Hindi).
- Rolling pin (called belan in Hindi)
- Tawa, which is a concave, flat pan to make roti or paratha. You can also use a cast iron pan or any flat pan.
- Flat spatula (Turner)
Keep the rolling board and rolling pin ready. Keep a bowl of dry flour and a bowl of ghee to apply on the paratha. If you want to add salt, ajwain, or chili powder, keep that ready. You want to roll and cook the paratha simultaneously so the rolled dough does not become dry.
Steps to roll layered round Paratha
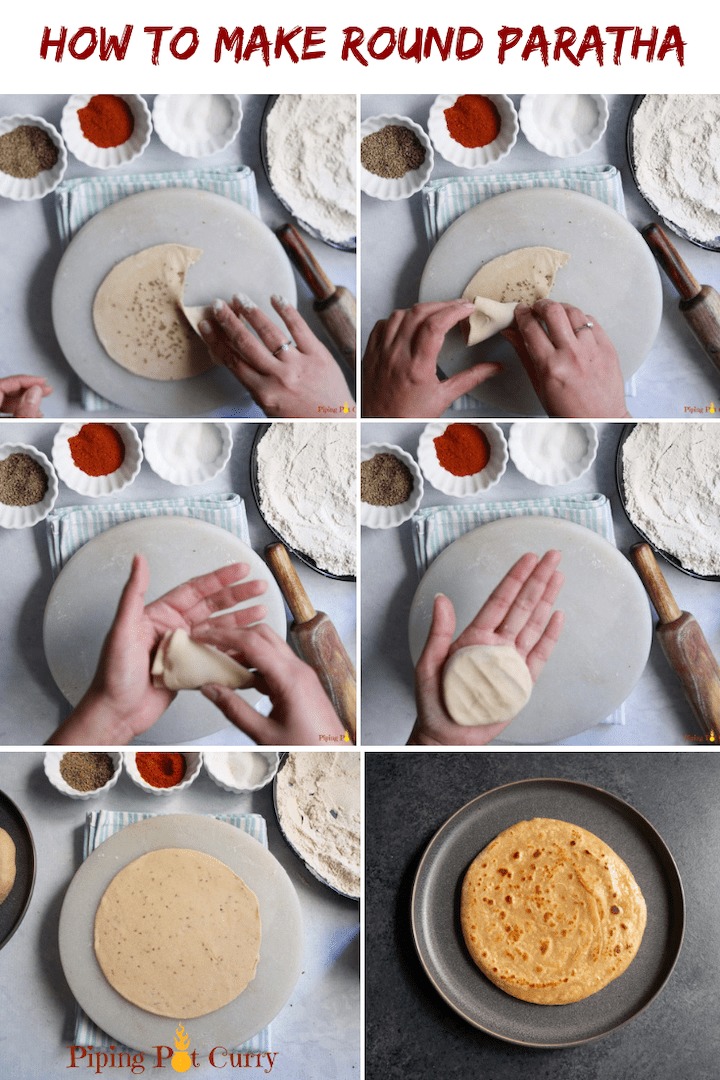
- Dip a ball in dry flour, place it on the marble or wooden base (chalka), and roll with the rolling pin. Roll into a circle of about 4 inches in diameter.
- Spread some ghee (and optionally salt and ajwain) on the dough.
- Make a cut up to the center of the circle, using your fingers. Then, start rolling on one side. Take the roll into your hand and flatten it (see picture below).
- Dip again in dry flour and start rolling using the rolling pin.
- Do not apply too much pressure while rolling. Apply equal pressure on all sides while rolling. When you roll with gentle hands, the dough flattens and moves in circles with the rolling pin. You can also turn the paratha with your hands at 90 degrees multiple times while rolling so that it forms a circle.
- Apply more flour if required while rolling. This process takes practice, so be patient!
- Dust off the flour by flipping the paratha between both your palms to remove any extra dry flour.
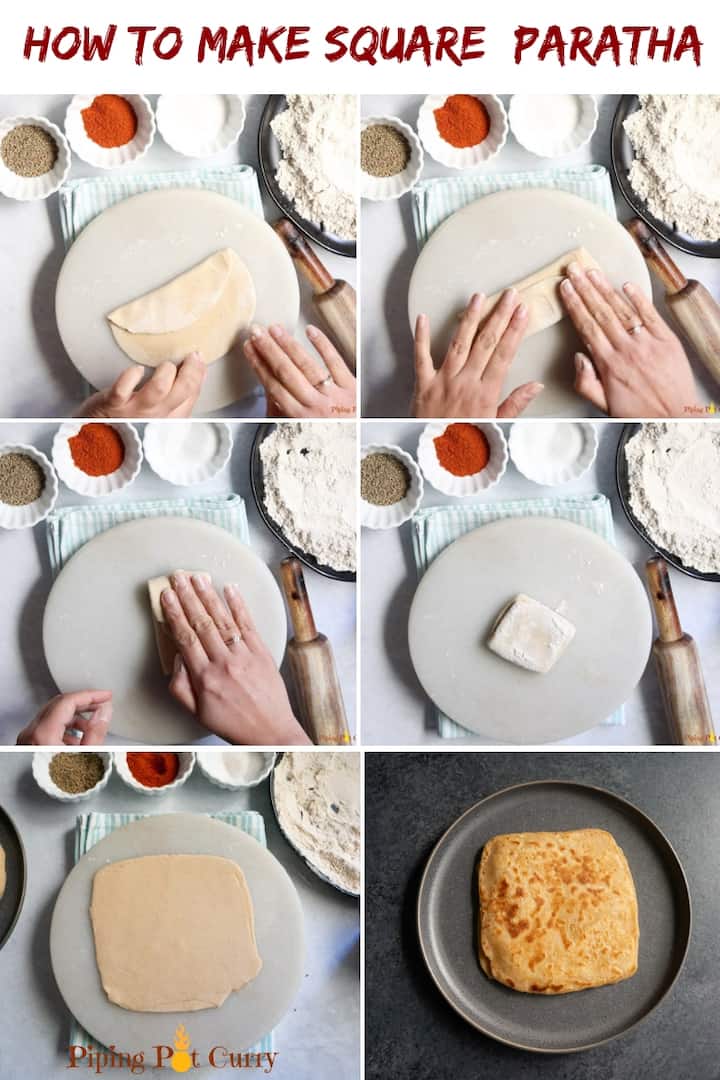
Steps to roll layered Square Paratha
- Dip a ball in dry flour, place it on the marble or wooden base (chalka), and roll with the rolling pin. Roll into a circle of about 4 inches in diameter.
- Spread some ghee (and, optionally, salt) on the dough.
- Bring one side of the rolled dough towards the center and press lightly. Now bring the other side on top of the folded dough and press lightly. Now, fold along the other edge similar to the one above to make a square (see picture below).
- Dip again in dry flour and start rolling using the rolling pin.
- Do not apply too much pressure while rolling. Apply equal pressure on all sides while rolling. You can also turn the paratha with your hands at 90 degrees multiple times to maintain the square shape while rolling. Apply more flour if required while rolling.
- Dust off the flour by flipping the paratha between both your palms to remove any extra dry flour.
- This process takes practice, so be patient!
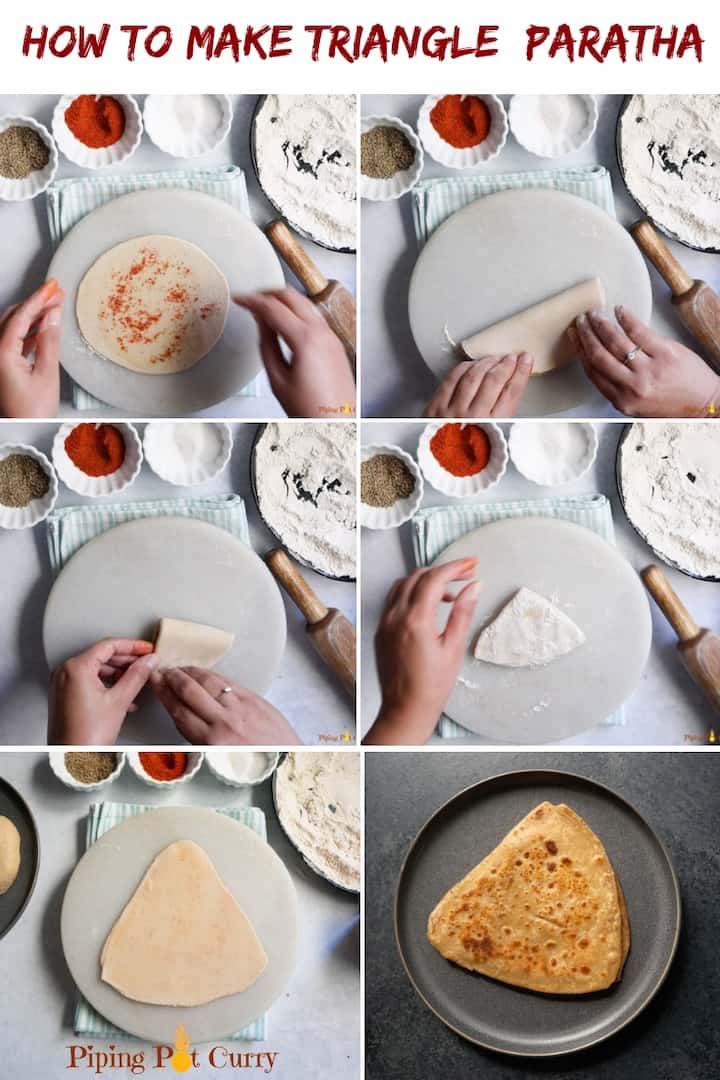
Steps to roll layered Triangle Paratha
- Dip a ball in dry flour, place it on the marble or wooden base (chalka), and roll with the rolling pin. Roll into a circle of about 4 inches in diameter.
- Spread ghee on the dough (optionally salt and red chili powder).
- Fold the rolled dough in half to form a semi-circle. Now fold from one end of the semi-circle to another to form a triangle (see picture below).
- Dip again in dry flour and start rolling using the rolling pin.
- Do not apply too much pressure while rolling. Apply equal pressure on all sides while rolling. You can also turn the paratha with your hands along each edge multiple times to maintain the triangle shape while rolling. Apply more flour if required while rolling.
- Dust off the flour by flipping the paratha between your palms to remove any extra dry flour.
- This process takes practice, so be patient!
Note: Even though I share all the shapes, rolling the dough evenly to the same thickness is the most important. A uniform shape looks good but is not required to make perfect soft and flaky parathas.
How to cook soft and flaky parathas?
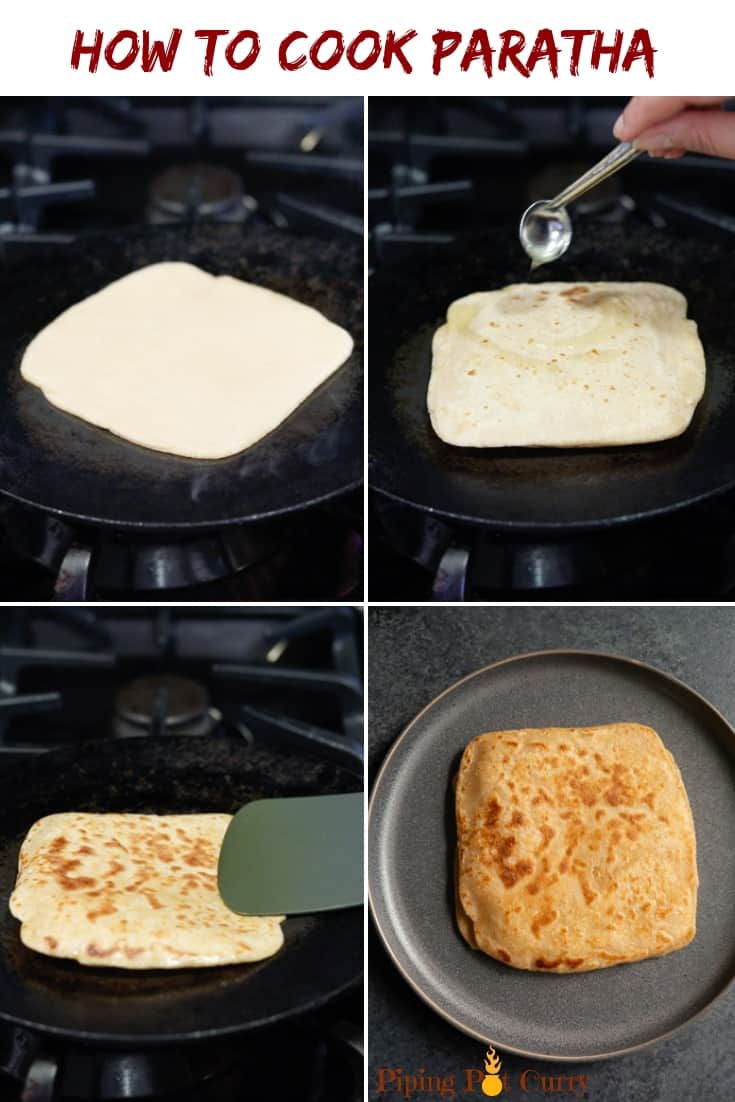
- Preheat a Tawa (griddle) on a medium-high flame.
- Pick the paratha and carefully transfer it to the tawa. Cook until you start seeing small air pockets and the color of the dough starts to change.
- With a flat spatula, flip the paratha and top it with ghee just enough to make the surface of the paratha greasy (about 1/4 teaspoon). Spread the ghee evenly over the paratha with the back of the spoon. Now, we want to cook until there are some brown spots on the paratha.
- Flip the paratha and top with ghee on the other side. Spread it evenly over the surface. Cook until there are brown spots while pressing gently with the spatula.
- When both sides have golden brown spots, transfer the paratha to a plate lined with a paper towel.
I usually keep the paratha on a paper towel or a thin cloth on a plate after cooking. Optionally apply ghee or butter and keep stacking them. Then, store in a hot casserole until serving (within a few minutes or an hour). Parathas are best served hot!
Tips for soft and flaky paratha
- Knead the dough well; it should not be too hard or too soft/sticky.
- Let the dough rest covered with a damp cloth for 15-30 minutes so the gluten is released and it becomes more pliable.
- Roll the dough with soft hands, applying equal pressure on all sides.
- You might need to use more dry flour when learning to make paratha. But always dust off any excess flour before cooking on the Tawa. Otherwise, the dry flour can make the paratha dry. As you get experienced, only apply dough once and roll the paratha.
- Making paratha needs lots of practice. So be patient and keep practicing.
How to store Paratha and dough?
- Storing Dough: Refrigerate in an air-tight container and use within 1-2 days. After about two days, the dough color starts to become brownish on the outside. To make paratha, get the dough to room temperature before using (else it might seem harder to roll)
- Storing Paratha: Cooked paratha can be refrigerated for 2-3 days. They might stick together due to the ghee. So let them come to room temperature or heat to separate them. You can also store it in a freezer for longer shelf life. Place parchment paper between them and then in a freezer bag like Ziploc. Note: It is hard to get them to be the same soft and flaky as freshly made 🙂
How to reheat paratha?
- Microwave: Keep on a paper towel and heat for 5-10 seconds.
- Stovetop Tawa: Heat each side until the paratha is soft again. Apply some ghee to make it fresher tasting.
How to pack paratha for lunch in a box?
- Do not pack hot off the griddle paratha in a closed box. It will get soggy. Place the cooked paratha on a paper towel and apply ghee/butter. Let it cool a little (not completely). Then, pack in an aluminum foil along with the paper towel.
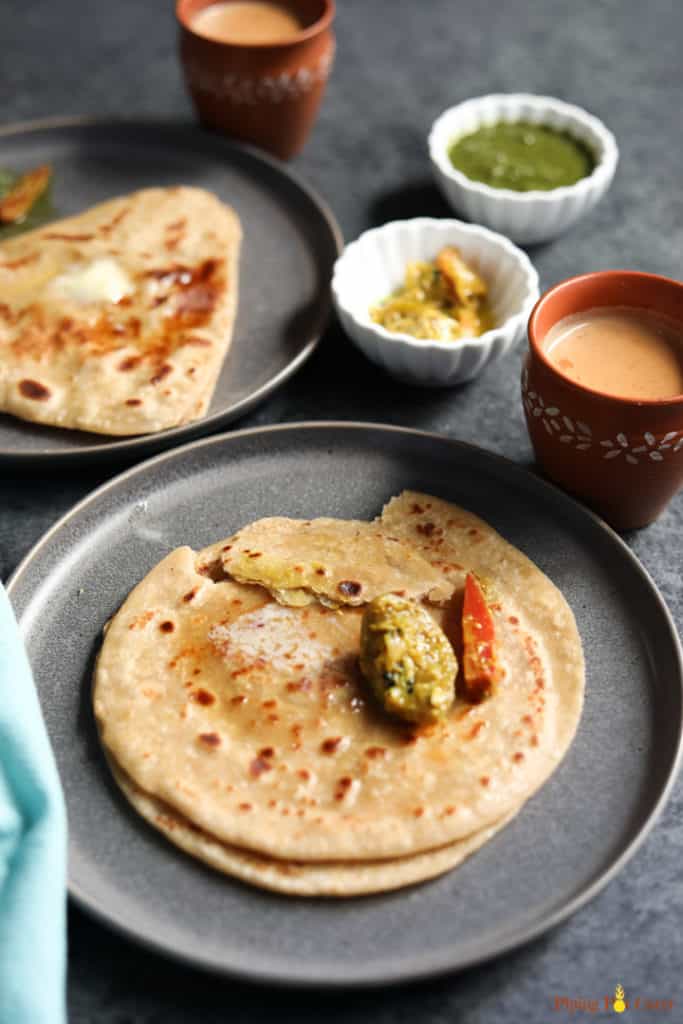
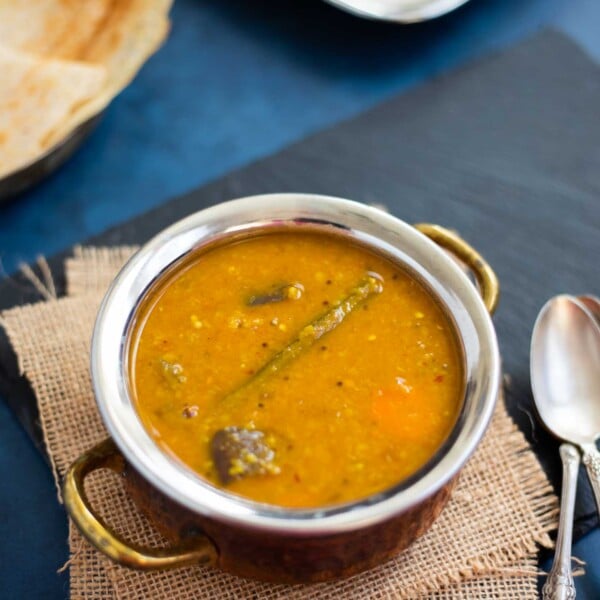
Pair paratha with any curry or lentils. Here are a few favorites:
Paratha Recipe (Pan-fried Indian flatbread)
Video
Ingredients
- 2 cups Whole Wheat flour
- 3/4-1 cup Water
- 1 teaspoon Salt
- 1 teaspoon Oil
For Rolling
- 1/4 cup Whole Wheat flour
- 2 tablespoon Ghee or Oil
For cooking
- 3 tablespoon Ghee or Oil
Equipment
- Marble or wood base , chakla in Hindi
- Rolling pin , belan in Hindi
- Tawa , concave flat pan, or a cast iron pan.
- Flat spatula (Turner)
Instructions
Make Paratha Dough
- In a large bowl or flat plate with high edges, take the whole wheat flour. Add salt (optional). Slowly start adding water and mix with hand. Don’t add all water at once. Keep adding water as needed, while mixing.
- Once the dough starts to form, do not add more water. It takes a little more than 3/4 cup of water to make the dough. The amount of water will vary depending on the brand of whole wheat flour.
- Make the dough smooth by kneading it with your fist. Add some water to your hand and knead 2-3 times. When you press your finger against the dough, it should leave an impression. This is the right consistency of the dough.
- You can apply some oil to make the dough edges less sticky. but this is not necessary. Dough should be soft. not hard (hard is best for puri’s). Same dough for paratha can be used to make roti too.
- Cover with a damp cloth or plastic wrap and let the dough rest for at least 15 mins and up to 30 mins. This helps gluten to release and the dough becomes more elastic. Open and knead once again.
- Make balls from the dough by rotating between your palms. The balls will be the size of a golf ball, sightly larger in size than roti. Make the ball a bit flat.
Steps to roll layered round Paratha
- Dip a ball in dry flour, place on the marble or wooden base (chalka) and roll with the rolling pin. Roll into a circle of about 4 inches diameter.
- Spread some ghee (and optionally salt and ajwain) on the dough. Make a cut up to the center of the circle, using your fingers. Then start rolling on one side. Take the roll into your hand and flatten it.
- Dip again in dry flour and start rolling using the rolling pin. Do not apply too much pressure while rolling. Apply equal pressure on all sides while rolling. When you roll with gentle hands, the dough flattens and moves in circles with the rolling pin. You can also turn the paratha with your hands at 90 degrees multiple times while rolling, so that it forms a circle. Apply more flour if required while rolling.
Steps to roll layered Square shaped Paratha
- Dip a ball in dry flour, place on the marble or wooden base (chalka) and roll with the rolling pin. Roll into a circle of about 4 inches diameter.
- Spread some ghee (and optionally salt) on the dough. Bring one side of the rolled dough towards the center and press lightly. Now bring the other side on top of the folded dough and press lightly. Now fold along the other edge similar to above to make a square.
- Dip again in dry flour and start rolling using the rolling pin. Do not apply too much pressure while rolling. Apply equal pressure on all sides while rolling. You can also turn the paratha with your hands at 90 degrees multiple times to maintain the square shape while rolling. Apply more flour if required while rolling.
Steps to roll layered Triangle shaped Paratha
- Dip a ball in dry flour, place on the marble or wooden base (chalka) and roll with the rolling pin. Roll into a circle of about 4 inches diameter.
- Spread some ghee (and optionally salt, red chili powder) on the dough. Fold the rolled dough in half to form a semi-circle. Now fold from one end of the semi-circle to other to form a triangle shape.
- Dip again in dry flour and start rolling using the rolling pin. Do not apply too much pressure while rolling. Apply equal pressure on all sides while rolling. You can also turn the paratha with your hands along each edge multiple times to maintain the triangle shape while rolling. Apply more flour if required while rolling.
Cooking Paratha
- Pre Heat a Tawa (griddle) on medium-high flame. Pick the paratha, flip between both palms to remove any extra dry flour and carefully transfer to the tawa. Cook until you start seeing small air pockets and the color of the dough starts to change.
- With a flat spatula, flip the paratha and top with ghee just enough to make the surface of the paratha greasy (about 1/4 teaspoon). Spread the ghee evenly over the paratha with the back of the spoon. Now we want to cook until there are some brown spots on the paratha.
- Flip the paratha and top with ghee on the other side. Spread it evenly over the surface. Cook until there are brown spots while pressing gently with the spatula.
- When both sides have golden brown spots, transfer the paratha to a plate lined with a paper towel.
- Optionally apply ghee or butter and keep stacking them. Paratha’s are best served hot!
Notes
- If the dough gets too sticky, add a tablespoon of flour at a time and knead again till all the flour is absorbed.
- If the dough gets too hard, it means less water was added. Add a tablespoon of water at a time and knead again. The dough should be soft enough that if you press your finger against the dough, it leaves an impression.
- Knead the dough well, it should be not too hard and not too soft/sticky.
- Let the dough rest covered with a damp cloth for 15-30 minutes, so the gluten is released and it becomes more pliable.
- Roll the dough with soft hands, applying equal pressure on all sides.
- When learning to make paratha, you might need to use more dry flour. But always dust off any excess flour before cooking on the Tawa, otherwise the dry flour can make the paratha dry. As you get experienced, only apply dough once and roll the paratha.
- Making paratha needs lots of practice. So be patient and keep practicing.



DO we use warm water?..if yes what would be the temp in F
Hi Nihal – Regular temperature water is fine to make the dough. I don’t warm the water for paratha dough.
Hi Meeta, I am quite knowlegeable in indian food but I have never really have an indian breakfast. I would like to know what can I make to eat with paratha for breakfast.
Actually, I found out that I have a quick metabolism so I have change my diet for the morning along side with my sons who are teenager. I love Indian food very much for the reason it does feel me up and bring satisfaction to my metabolism.
Please let me know about it.
Thank you
Hi Elizabeth- So glad you are enjoying Indian food. I would suggest to try aloo paratha or paneer paratha, which are stuffed parathas. We usually serve them with yogurt raita and a cup of tea for breakfast. Here are some more popular Indian breakfast recipes – https://pipingpotcurry.com/indian-breakfast-recipes/